volatility3 使用笔记
volatility3 安装
volatility3 需要 Python 3.6.0 或更高版本。
使用 pip 进行包安装。
1 | pip install volatility3 |
如果安装失败,进入
https://github.com/volatilityfoundation/volatility3/releases
选择volatility3-2.0.0-py3-none-any.whl进行下载

通过以下指令进行自动化安装
1 | pip3 wheel volatility3-2.0.0-py3-none-any.whl |
若安装失败可直接下载源码后直接使用,但需要手动调用脚本
vol.py
1 | python3 vol.py --help |
可以通过以下指令达到与
.whl安装同样的效果
2
python3 setup.py install
如果需要使用 volatility3 完整功能,请保存文件 https://github.com/volatilityfoundation/volatility3/blob/develop/requirements.txt
然后运行以下指令安装 volatility3 所需依赖
1 | pip3 install -r requirements.txt |
volatility3 使用
使用
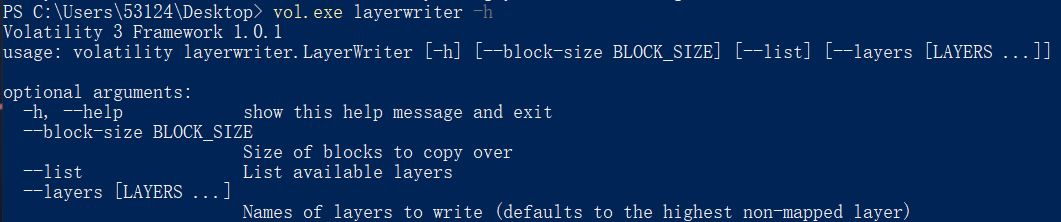
通过 -h 指令获取帮助
1 | vol.exe -h |
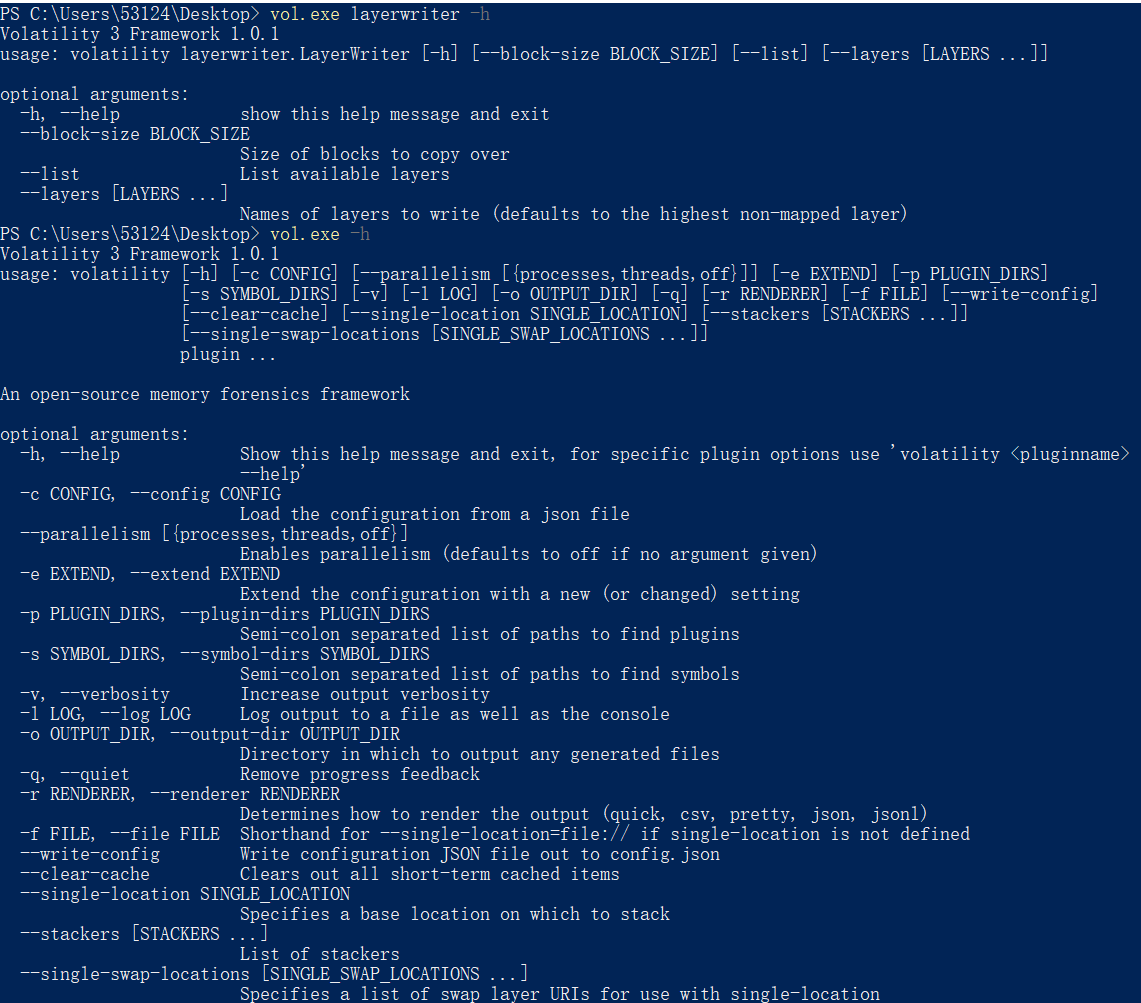
同样地,可以对插件使用 -h 指令获取插件帮助
插件
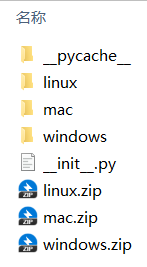
使用对应 linux / mac / windows 插件之前,请先下载对应的符号表(最好下载所有的符号包):
https://downloads.volatilityfoundation.org/volatility3/symbols/windows.zip
https://downloads.volatilityfoundation.org/volatility3/symbols/mac.zip
https://downloads.volatilityfoundation.org/volatility3/symbols/linux.zip
并将其解压在 ./volatility/symbols/ 目录下
以下,部分插件可能出现不存在或者更名的情况,我并不会及时更新,请以官方帮助为准
| 插件名 | 用法 |
|---|---|
layerwriter |
列出内存镜像 platform 信息,分割 layers |
linux.bash |
从内存中恢复 bash 命令历史记录 |
linux.check_afinfo |
验证网络协议的操作功能指针 |
linux.check_syscall |
检查系统调用表中的挂钩 |
linux.elfs |
列出所有进程的所有内存映射ELF文件 |
linux.lsmod |
列出加载的内核模块 |
linux.lsof |
列出所有进程的所有内存映射 |
linux.malfind |
列出可能包含注入代码的进程内存范围 |
linux.proc |
列出所有进程的所有内存映射 |
linux.pslist |
列出 linux 内存映像中存在的进程 |
linux.pstree |
列出进程树 |
mac.bash |
从内存中恢复 bash 命令历史记录 |
mac.check_syscall |
检查系统调用表中的挂钩 |
mac.check_sysctl |
检查 sysctl 处理程序的挂钩 |
mac.check_trap_table |
检查 trap 表中的挂钩 |
mac.ifconfig |
列出网卡信息 |
mac.lsmod |
列出加载的内核模块 |
mac.lsof |
列出所有进程的所有内存映射 |
mac.malfind |
列出可能包含注入代码的进程内存范围 |
mac.netstat |
列出所有进程的所有网络连接 |
mac.psaux |
恢复程序命令行参数 |
mac.pslist |
列出 mac 内存映像中存在的进程 |
mac.pstree |
列出进程树 |
mac.tasks |
列出 mac 内存映像中存在的进程 |
windows.info |
显示正在分析的内存样本的 OS 和内核详细信息 |
windows.callbacks |
列出内核回调和通知例程 |
windows.cmdline |
列出进程命令行参数 |
windows.dlldump |
将进程内存范围 DLL 转储 |
windows.dlllist |
列出 Windows 内存映像中已加载的 dll 模块 |
windows.driverirp |
在 Windows 内存映像中列出驱动程序的 IRP |
windows.driverscan |
扫描 Windows 内存映像中存在的驱动程序 |
windows.filescan |
扫描 Windows 内存映像中存在的文件对象 |
windows.handles |
列出进程打开的句柄 |
windows.malfind |
列出可能包含注入代码的进程内存范围 |
windows.moddump |
转储内核模块 |
windows.modscan |
扫描 Windows 内存映像中存在的模块 |
windows.mutantscan |
扫描 Windows 内存映像中存在的互斥锁 |
windows.pslist |
列出 Windows 内存映像中存在的进程,转储处理可执行映像 |
windows.psscan |
扫描 Windows 内存映像中存在的进程 |
windows.pstree |
列出进程树 |
windows.registry.certificates |
列出注册表中存储的证书 |
windows.registry.hivelist |
列出内存映像中存在的注册表配置单元 |
windows.registry.hivescan |
扫描 Windows 内存映像中存在的注册表配置单元 |
windows.registry.printkey |
在配置单元或特定键值下列出注册表项 |
windows.registry.userassist |
打印用户助手注册表项和信息 |
windows.ssdt |
列出系统调用表 |
windows.strings |
读取字符串命令的输出,并指示每个字符串属于哪个进程 |
windows.svcscan |
扫描 Windows 服务 |
windows.symlinkscan |
扫描 Windows 内存映像中存在的链接 |
操作
查看映像信息
1 | vol.exe -f xxx.raw windows.info |
查看映像进程
1 | vol.exe -f xxx.raw windows.pslist |
查看指定 pid 的进程
1 | vol.exe -f xxx.raw windows.pslist --pid 1234 |
进程转储
1 | vol.exe -o ./outputdir/ -f xxx.raw windows.pslist --pid 1234 --dump |
内存转储
1 | vol.exe -o ./outputdir/ -f xxx.raw windows.memmap --pid 1234 --dump |
查看句柄
1 | vol.exe -f xxx.raw windows.handles |
查看 DLL
1 | vol.exe -f xxx.raw windows.dlllist |
DLL 转储
1 | vol.exe -o ./outputdir/ -f xxx.raw windows.dlllist --pid 1234 --dump |
查看命令行
1 | vol.exe -f xxx.raw windows.cmdline |
查看网络端口
1 | vol.exe -f xxx.raw windows.netscan |
查看完整的结果,但可能包含垃圾信息和虚假信息 (谨慎使用)
1 | vol.exe -f xxx.raw windows.netscan --include-corrupt |
查看注册表信息
1 | vol.exe -f xxx.raw windows.registry.hivescan |
查看指定过滤器 (文件夹) 下的注册表信息
1 | vol.exe -f xxx.raw windows.registry.hivelist --filter FILTER |
注册表信息转储
1 | vol.exe -o ./outputdir/ -f xxx.raw windows.hivelist --filter FILTER --dump |
查看注册表键值对
1 | vol.exe -f xxx.raw windows.registry.printkey |
查看指定过滤器 (文件夹) 下的注册表信息,但需要
hivelist 提供的 offset
1 | vol.exe -f xxx.raw windows.registry.printkey --offset OFFSET |
查看指定键下的注册表值
1 | vol.exe -f xxx.raw windows.registry.printkey --key KEY |
打印所有键的信息
1 | vol.exe -f xxx.raw windows.registry.printkey --recurse |
查看文件信息
1 | vol.exe -f xxx.raw windows.filescan |
建议通过 powershell 的 Select-String 或者 bash 的 grep 进行搜索,如:
文件转储
需要 pslist 提供的 pid
1 | vol.exe -o ./outputdir/ -f xxx.raw windows.dumpfiles --pid 1234 |
(推荐) 需要 filescan 提供的 offset
(一般来说为 physaddr)
1 | vol.exe -o ./outputdir/ -f xxx.raw windows.dumpfiles --virtaddr 0xee1122 |
查找恶意注入代码
1 | vol.exe -f xxx.raw windows.malfind |
恶意注入代码转储
1 | vol.exe -o ./outputdir/ -f xxx.raw windows.malfind --pid 1234 --dump |
库使用方法
有时候我们想要使用 Python 调用 volatility3 来实现一些自动化取证的功能,故在这里记录一下个人经验。
在 volatility3 的文档和代码中,都十分推荐使用 cli 模块的书写方式来编写调用代码。
可以定位到
.venv\Lib\site-packages\volatility3\cli\__init__.py,观察
run(self) 代码
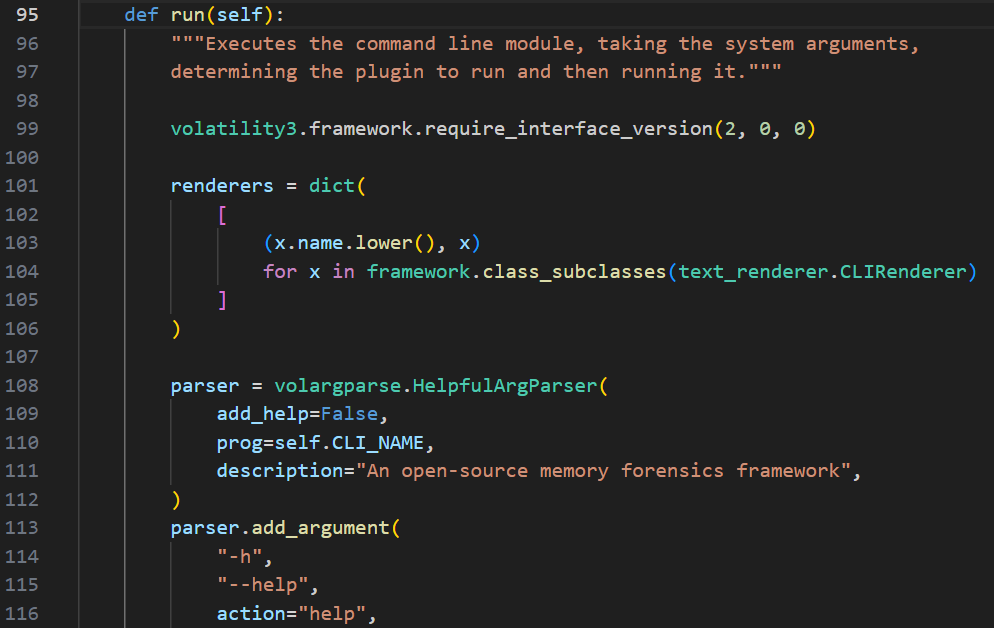
1 | from volatility3.cli import ( |
需要注意的是,plguin_list 的键都是完整的类名,而
construct_plugin 的 plugin
参数必须是一个插件类(实现了接口
interfaces.plugins.PluginInterface),也可以自行导入
1 | from volatility3.plugins.windows import pslist |
这里没有高亮是因为
pslist实际上在volatility3.framework.plugins中,volatility3.plugins模块会动态导入(因为有些插件需要一些必要的模块支持)。
如果说需要输出到文件中,还可以使用
volatility3.cli.text_renderer 模块中的一些渲染器渲染
grid,由于该种使用方法书写较少,这边不在赘述。
插件编写
基本
volatility 的强大不仅在于其解析能力,还在于其可拓展性,即可以随心所欲的编写插件来扩展它的能力。
而其中,volatility3 不仅重构了逻辑,同时使得插件编写更为容易和简单。
对于一个插件,首先需要继承
interfaces.plugins.PluginInterface,接口要求实现一个
run(self) 成员函数,返回值必须是一个
interfaces.renderers.TreeGrid(这里只是一个接口,实际上返回值可以是实现了该接口的任何对象,下面为了方便一律使用标准实现
renderers.TreeGrid);
其次还需给 _required_framework_version
赋值,这是用于检查插件所需 volatility3 版本的。由于目前 volatility3
的版本号是 2.x.x,故至少需要修改为 (2, 0, 0)。
基本代码框架如下
1 | from volatility3.framework import interfaces, renderers |
可以创建一个文件夹,将插件脚本放入,在这里我将文件夹命名为
plugins,而为了更好的代码规范(官方有提供插件代码规范)文件名是
test.py。
那么可以尝试运行插件,其中 -p 是指定额外插件文件夹
1 | vol.exe -p .\plugins\ test |
那么应该可以观察到回显
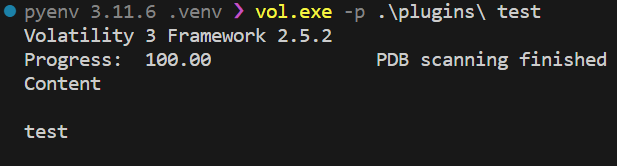
那么可以结合 TreeGrid
的注释将其理解为一个表格,第一个参数是一个列表,用来定义列名(Content)和列元素类型(str);第二个参数是一个表格行列表,是一个元组,第一个整数(0)代表某一行的树形
Level,第二个是行元素的值(列表 ["test"])。
但是我们写插件,不是只是为了获取一个表格的输出,是想对内存镜像文件进行处理,那么这里需要编写第二个函数
get_requirements(cls),这是一个
classmethod,修改后的框架如下
1 | from volatility3.framework import interfaces, renderers |
这样可以定义插件需要的输入,比如说在这里,需要一个
Module(这里不具体描述 Module 在 volatility3
中是什么,仅需知道如果想要输入一个 Windows
内存镜像文件,必须这样书写,对于其他系统可以参考官方插件的编写)。
可以发现,返回值是一个列表,所以我们还可以定义多个要求,比如说需要额外的参数
1 |
|
那么我们可以尝试输入一个镜像文件,且输入该插件参数。(也可以尝试不输入,volatility3 将会报错并终止插件运行)

想要获取参数值,可以从 self.config
中获取,例如可以尝试在 run(self) 中加入代码
1 | flag = self.config["qsdzyyds"] |

也可以自行尝试打印整个 config 字典。
我们尝试获取 Module,这相当于 volatility3
分析后的内存镜像文件:
1 | kernel = self.context.modules[self.config["kernel"]] |
kernel = <volatility3.framework.contexts.Module object at 0x0000017C7C2B2C90>
这里引出 volatility3 中一个十分重要的对象 context。
在 volatility3 的插件中,维护一个上下文(context),可以通过 context 访问 volatility3 帮助分析的一些内容,在我们的插件中也可以向上下文中修改或添加值来进行传递。
很多功能并不需要自己书写,就像 Python 调用其他库那样,volatility3
也可以很轻松的调用插件,比如说 pslist.PsList 插件。
1 | from volatility3.framework import interfaces, renderers |
这里省略了一部分代码,只展示如何调用 pslist
插件的一些功能,比较常用的是 list_processes,它将返回一个
EPROCESS 结构体的迭代器,方便遍历内存中的所有进程。
对于其他的插件,用法是类似的,需要传递的参数通过函数注释就可以了解。
可以通过官方插件 pslist 的 _generator
函数学习一些用法。
objects 中的类型可以称为 vol 对象类型,最基本的都遵循
ObjectInterface 接口,vol
对象是一种代理类,可以通过它直接获取内部表示的成员,例如说这里的
EPROCESS 的 UniqueProcessId 成员。
同时一个 vol 对象也可以转换为其他对象,可以使用 cast
方法进行转换,对于不同的类型所需的额外参数不相同。
至此一个 volatility3 插件的编写流程已经结束。
vol 对象
每一个 vol 对象都会实现接口
ObjectInterface,接口满足存在一个成员 vol
会返回一个字典,其中包含一些必要的信息,可以编写代码进行查看
1 | def run(self): |
可以观察到回显为
1 | {'size': 896, 'members': {...}, 'layer_name': 'layer_name_Process428', 'offset': 8796092887040, 'member_name': None, 'parent': None, 'native_layer_name': 'layer_name_Process428', 'type_name': 'symbol_table_name1!_PEB'} |
这是一个字典,其中 size
代表的是该对象的大小;members
是该对象的成员(如果是结构体的话);offset
是内存中的地址(即指针);如果存在的话,member_name 和
parent 显示的是该对象作为某个 parent
结构体对象的成员名 member_name;type_name
是该对象类型在符号表中的名字。
符号表类型将由 kernel.symbol_table_name
和具体结构体名(在这里是 _PEB)通过
constants.BANG 拼接而成。
对于任意一个 vol 对象,都可以使用 cast
进行转换,转换后不一定可以成功,可以通过
has_member,has_valid_member,has_valid_members
函数进行验证是否转换成功。
比较特别的有 Pointer vol
对象,对于指针对象我们可以进行取值
dereference(),通常由于符号表中定义为 VOID*
指针类型,故经常与 cast 搭配使用,例如
1 | # 从PEB中获取进程的默认堆(PHEAP) |
kernel
在这里主要针对的是
kernel = self.context.modules[self.config["kernel"]]。
kernel 常用的函数有
get_enumeration,get_type 和
get_symbol,可以通过他们获取符号表中的具体类型。
Notepad 插件实战
分析
在 volatility2 中,十分热门的一个插件是 notepad
插件,但这个插件在 volatility3 中是不存在的,我们可以通过模仿
volatility2 编写一个 volatility3 版本的 notepad 插件。
vol2-notepad 插件源码地址:https://github.com/volatilityfoundation/volatility/blob/master/volatility/plugins/notepad.py
首先对插件源码进行分析,基本逻辑如下
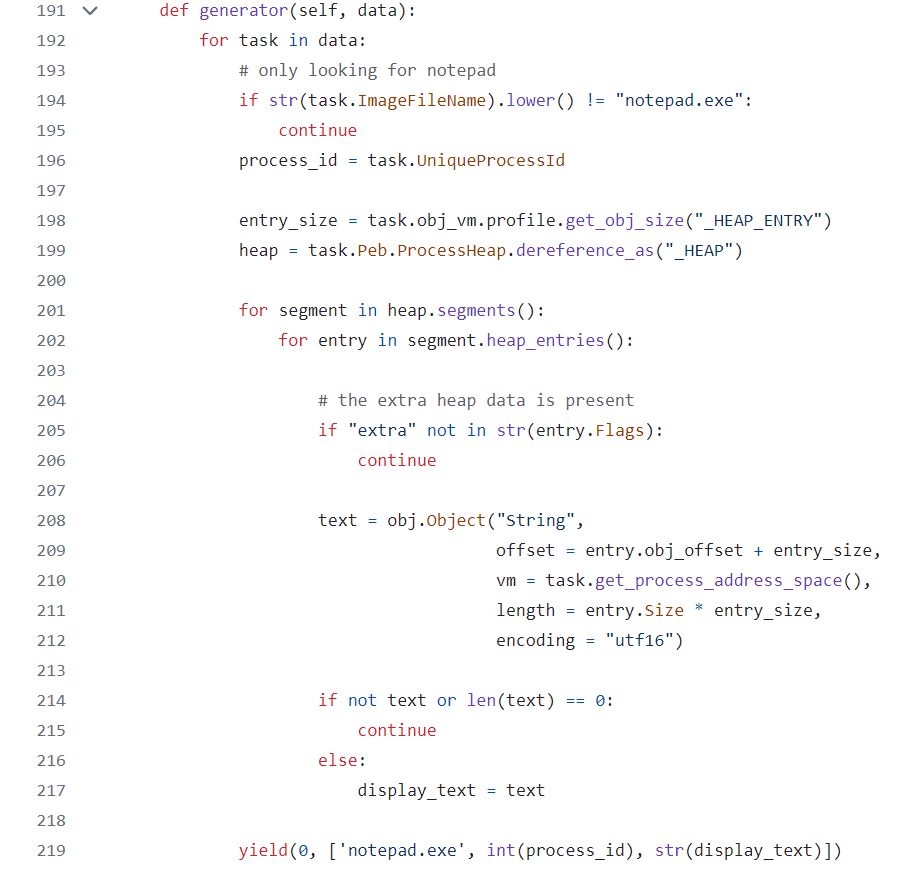
简单而言可以概括为
- 获取 EPROCESS 列表,遍历每一个进程 task
- 获取 task 的 PEB,然后从 PEB 中获取堆(HEAP)
- 遍历堆的段(HEAP_SEGMENT)
- 遍历段的堆块头(HEAP_ENTRY),随后获取堆块的内容
- 返回堆块的内容
遍历 EPROCESS 列表
在这里利用 pslist 的方法获取
1 | class Notepad(interfaces.plugins.PluginInterface): |
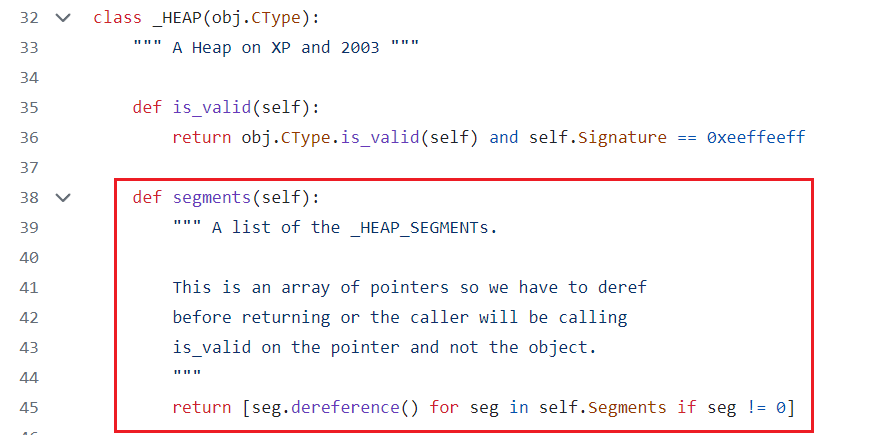
获取堆
1 | class Notepad(interfaces.plugins.PluginInterface): |
获取段
适当参考插件源码
1 | class Notepad(interfaces.plugins.PluginInterface): |
获取堆块头
适当参考插件源码
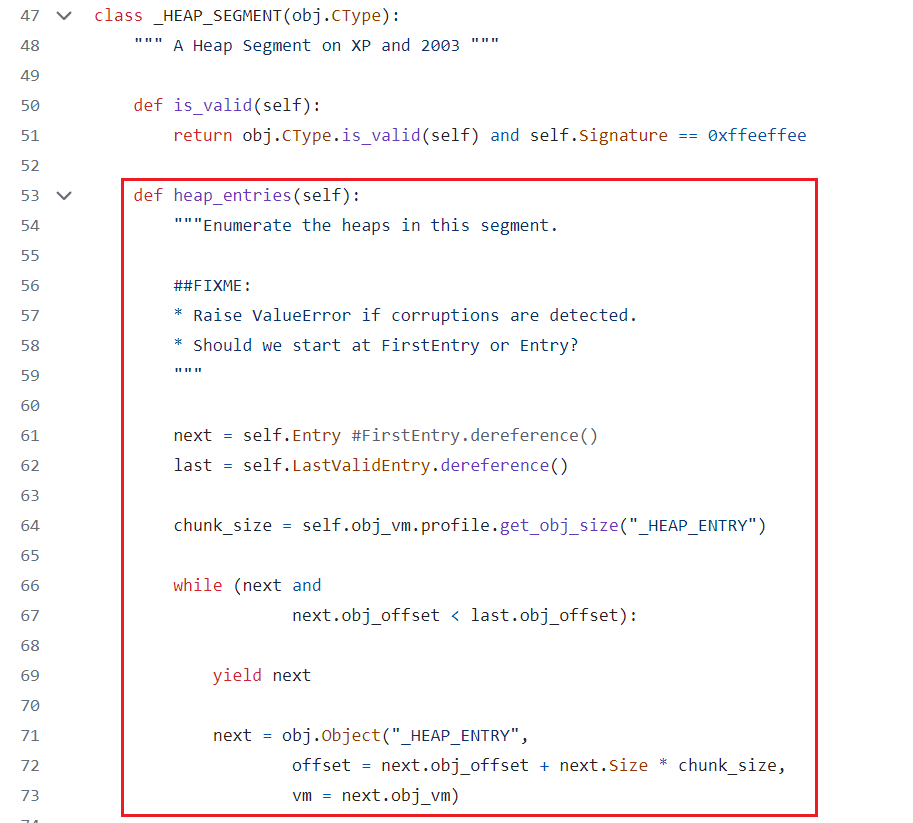
这里需要仿造 vol2 那样定义堆块头的一个 Flags 枚举值
1 | from enum import IntFlag |
那么可以编写代码
1 | class Notepad(interfaces.plugins.PluginInterface): |
获取堆块内容
适当参考插件源码
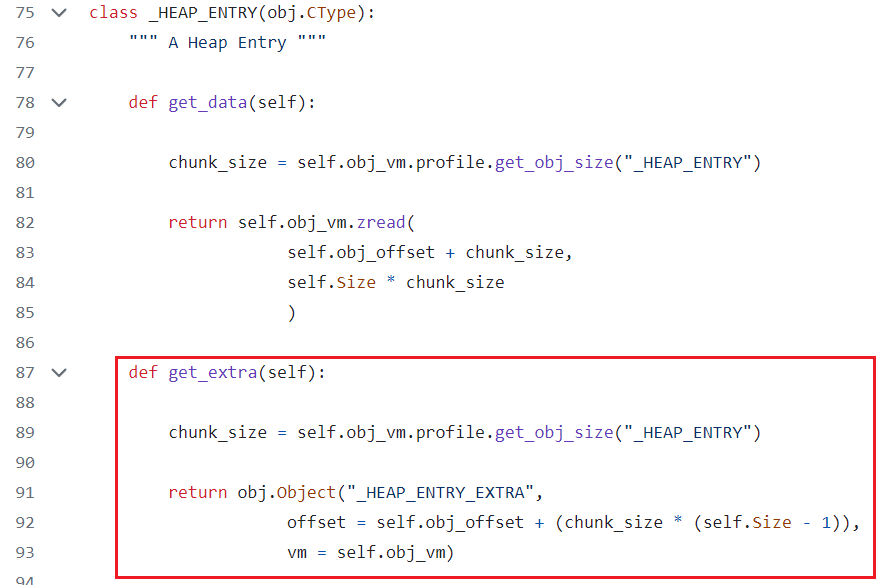
1 | def extra(self, entry: objects.StructType): |
输出
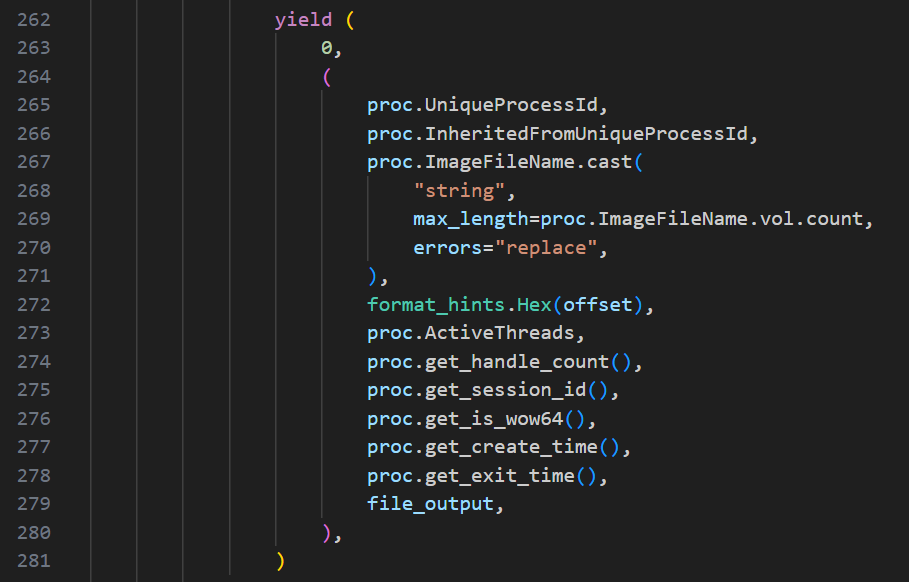
最后,我们编写完整 _generator 函数即可。
完整代码如下:
1 | from volatility3.framework import interfaces, renderers, objects |
尝试运行得到回显如下
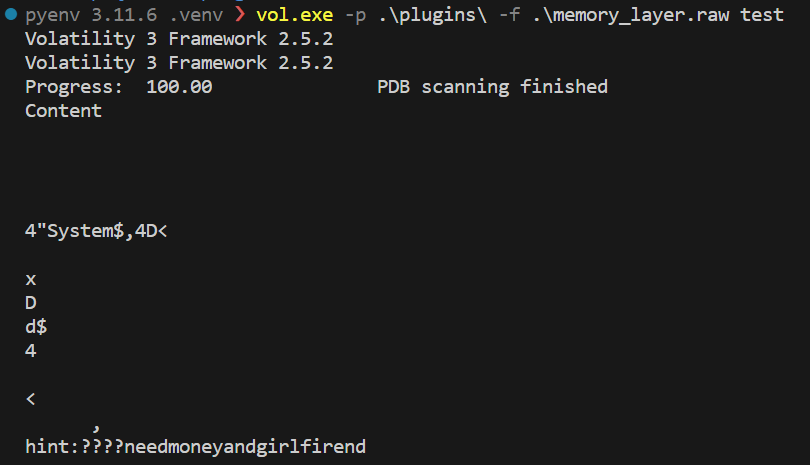
更完善的版本已经放在 GitHub 上,实际上拥有 FLAGS 标签的才有可能是 USER 堆块。
错误解决方案
编码错误
有时由于内存转储文件存在错误,导致内容失效,此时可能导致文本渲染错误

打开异常最先出现的位置
./volatility3/cli/text_renderer.py 定位
line 173

修改代码为
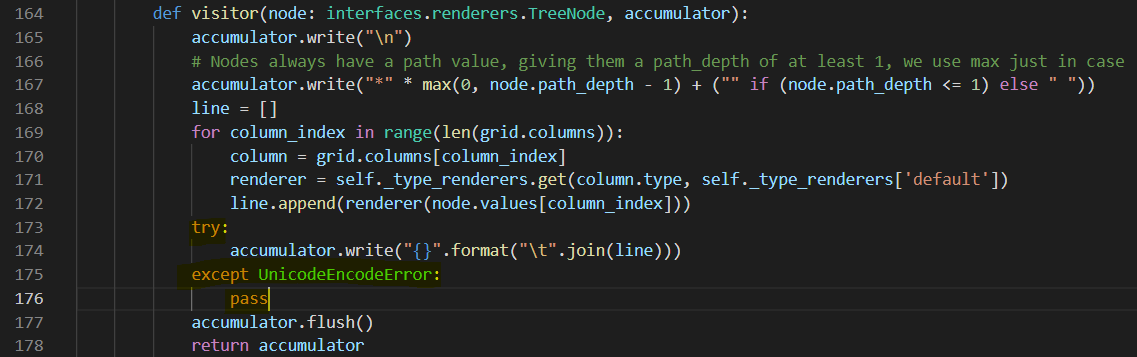
此法为暴力破解,可以解决程序因抛出异常后中断执行问题(处理方式为不处理异常继续运行程序)。
除此之外更加推荐使用指令 -r json 切换渲染模式为 json
格式,随后输出到文件中。