图片取证笔记

图片取证

简述

图片取证主要包括隐写 (Steganography),拼图,读图等。

同时图片又有多种格式,包括但不限于 GIP, PNG, JPEG 等。

以下的各种图片取证形式不限于单一格式。

Chaya

使用 LSB-LPS 技术进行隐写的软件,除非 python 库和 python 本身存在漏洞,否则无法使用标准超级计算机来破解此问题。

EXIF

Exchangeable image file format,即可交换图片文件格式,可以理解为是图片数据的元数据格式,用于保存图片相关的信息,多用于数码相机中。

例如光圈大小、镜头参数、拍摄时间等都会被记录在 EXIF 中,曾经有段时间社交平台并不会对 JPEG 文件二次渲染,导致 EXIF 信息频繁泄露个人信息(比如 GPS 定位等)。

可以使用 exiftool 工具查看文件的 EXIF 信息,也可以使用在线网站 图虫EXIF

由于 EXIF 格式的方便性,不止是图片格式会携带 EXIF 信息,包括但不限 PDF 同样可以携带 EXIF 信息。

但是需要注意的是 exiftool 对 PDF 文件的更改是可逆的,因为原始元数据实际上从未从这些文件中删除。有关详细信息,请参阅 PDF 标签文档。

F5-steganography

一款针对 TRUE COLOR 模式保存图片信息的 BMP、GIF 和 JPEG 的隐写软件,使用 stegdetect 工具可以检测到。

仓库链接 F5-steganography

gimp

gimp 是一款开源图片编辑软件,它有个很特别的功能是从数据中读取图片,这可以导致如果你不了解某个数据是哪种图片类型时,其依旧可以正常显示图片内容(需要将后缀改成 .data)。

但需要注意的是,可能会产生一定的识别错误,比如说宽度识别错误等。

LSB 隐写

LSB 的全称为 Least Significant Bit,在二进制数中意为最低有效位。LSB 位于二进制数的最右侧。

MSB 的全称为 Most Significant Bit,在二进制数中属于最高有效位。MSB 是最高加权位,若 MSB=1 则表示数据为负值;若 MSB=0 则表示数据为正。

加密流程即将数据转换为二进制后,将数据隐藏在最低有效位中。

简单的解密脚本:

1
2
3
4
5
6
7
8
9
from PIL import Image
import numpy as np

def lsb(im):
im = np.array(im, dtype = np.uint8).flatten()
t = im & 0x1
return t
# 返回二进制字符串
# return ''.join(map(str, t.tolist()))

同时也可以对不同的通道取值,例如这里对第二低有效位进行 LSB 隐写提取:

1
2
3
4
5
6
7
8
9
from PIL import Image
import numpy as np

def lsb(im):
im = np.array(im, dtype = np.uint8).flatten()
t = im & 0x3
return t
# 返回二进制字符串
# return ''.join(map(str, t.tolist()))

或者只对单个颜色信道进行 LSB 隐写提取,例如这里对 R 信道进行 LSB 隐写提取:

1
2
3
4
5
6
7
def lsb(im):
im = np.array(im, dtype = np.uint8)[:, :, 0]
print(im)
t = im & 0x1
return t
# 返回二进制字符串
# return ''.join(map(str, t.tolist()))

如果发现 LSB 痕迹但无法提取明文,可能考虑是加密后(需要密码)的 LSB 隐写,可以使用工具 https://github.com/livz/cloacked-pixel

OpenStego

OpenStego 是一个隐写术应用程序,提供两个功能:

  1. 数据隐藏:它可以隐藏图像文件中的任何数据。
  2. 水印:使用不可见的签名为图像文件添加水印。它可用于检测未经授权的文件复制。

有图形化界面。

OpenSuff

与 OpenStego 类似,同样有图形化界面。

oursecret

oursecret 是一款较老的软件,支持对 jpeg 和 bmp 的隐写。

它可以隐写任何数据在图像中,并且可以完整提取出包含文件名的数据。

需要使用密码进行数据提取和数据加密。

silenteye

Silenteye 是一个利用 lsb 对目标数据进行隐藏的软件(十分的老),图片格式支持 jpeg 和 bmp 格式。

直接拖拽目标文件,点击 Decode 可以解密其中的隐藏数据。

同时可能它会使用 AES 对数据进行加密,需要进行密码的填写。

silenteye encrypted

steghide

可以对常见的图片格式(如 jpg)进行隐写和提取,同时也对部分音频格式支持隐写和提取。

常常使用 steghide info filename.jpg 对目标文件进行检测。

如果想要明文使用密码提取文件隐写数据,可以使用以下命令:

1
steghide extract -sf filename -p password

它会将隐写数据输出到文件当中。

如果不知道密码,我们可以使用 shell 脚本对密码进行爆破:

1
2
3
4
5
6
7
8
9
10
#bruteStegHide.sh 
#!/bin/bash

for line in `cat $2`;do
steghide extract -sf $1 -p $line > /dev/null 2>&1
if [[ $? -eq 0 ]];then
echo 'password is: '$line
exit
fi
done

使用方法为:

1
./bruteStegHide.sh test.jpg passwd.txt

如果感觉爆破速度太慢,可以尝试使用 Stegseek 这个开源软件对 steghide 的密码进行爆破,该软件效率极高,更推荐使用该款软件。

使用方法:

1
stegseek stegofile.jpg [wordlist.txt]

如果不填写参数 wordlist.txt 将默认读取 /usr/share/wordlists/rockyou.txt

或者使用爆破种子的方式无密码提取文件(如果无加密的话):

1
stegseek --seed stegofile.jpg

如果有加密的情况,也可以使用该方式来探测是否存在 steghide 隐写。

stegsolve

stegsolve.jar 是一款很优秀的 lsb/msb 隐写取证工具,基本上可以让隐写无处遁形。

使用方向键可以查看各个信道所隐藏的数据(以单色图形式显示),但该软件不支持缩放,对于过大的图片,可能无法查看全貌,所以最好养成每个角落都需要注意的习惯。

Analyze 中的 Data Extract 功能可以同时提取多个信道的数据进行查看和保存,但高亮堪忧,并不是很好查看。

Analyze 中的 Stereogram Solver 功能可以将图片偏移叠加。

Analyze 中的 Frame Browser 功能可以将 GIF 图分解为多图层进行查看,优点是比 Ps 的速度要快,缺点是只能看到显示,并不能像 Ps 一样进行微操。

Analyze 中的 Image Combiner 功能可以将两张图片进行叠加查看(以像素异或,像素加减等形式)。

wbStego

一个隐写工具,支持对 BMP 文件的隐写。

同时支持 PDF、HTML 等文件。

zbarimg

一个好用的 QRCode 自动化识别工具,主要的使用方式是

1
zbarimg --raw -Sbinary pic.png

zsteg

zsteg 可以快速扫描出 bmp 和 png 等格式中的 lsb、msb 隐写,但可能存在一定的误差,尤其是对于单信道文本隐藏而言,如果有不确定的情况建议使用 stegsolve 进行查看和数据提取。

zsteg 常用的参数有:

参数 作用
-a 对所有信道所有可能进行全方面扫描
-E 提取特定信道的数据
-v 提取出有效数据并显示出来

可以使用 zsteg -h 获取更多帮助

通常也可以直接填写特定的信道名称来进行扫描,并不需要填写固定参数,如

1
zsteg fname.png 2b,b,lsb,xy

或者如果想要查看提取出来的有效数据:

1
zsteg fname.png 2b,b,lsb,xy -v

黑白图片像素

一张图片只有肉眼可见的杂乱无章的黑白像素(虽然实际像素颜色可能一定为 0, 0, 0 或 255, 255, 255),那么需要考虑是否要按列或按行组合成 8 位一组的 ascii 码。

图片像素差异

以下是提取差异像素的示例脚本,注意如果差异的像素是 white,需要将 diff 的初始颜色改为其他颜色。

1
2
3
4
5
6
7
8
9
10
11
12
13
14
15
16
17
18
19
20
21
from PIL import Image

comparison = "to.png"
target = "to_do.png"

comparison = Image.open(comparison)
target = Image.open(target)
diff = Image.new(comparison.mode ,comparison.size, 'white')

dcomparison = comparison.load()
dtarget = target.load()
ddiff = diff.load()

width, height = comparison.size

for w in range(width):
for h in range(height):
if dcomparison[w, h] != dtarget[w, h]:
ddiff[w, h] = dtarget[w, h]

diff.save("diff.png", comparison.format)

图片像素差异上可能会有一些文章,比如说多行的 0,1(黑白)元素可能有不同的代表含义。譬如 8 个一组可以看作是 ascii 码,譬如一行 256 个元素,以 1(白)元素个数为 ascii 码。

图片像素差异可能的情况

信息隐藏

有一种可以将信息隐写在图片中的算法,使用在线解密网站即可

光栅图像

由大量等宽等间距的平行狭缝构成的光学器件称为光栅,实际上我们可以用计算机模拟出透过光栅的图像。

Password

一个可能的光栅图像如上所示。

可以写出代码来展示光栅后的图像,需要给出起始位置和光栅间隔

1
2
3
4
5
6
7
8
9
10
11
from PIL import Image
import numpy as np

img = Image.open('Password.png').convert('L')
width, height = img.size
img_data = np.array(img)
start = 4
interval = 5
for i in range(start, width, interval):
img_data[:, i:i+interval-1] = 0
Image.fromarray(img_data)

以下是可旋转光栅的代码:

1
2
3
4
5
6
7
8
9
10
11
12
13
14
15
16
17
18
19
20
21
22
23
24
25
26
27
28
29
30
31
32
33
34
35
36
37
38
39
40
41
42
43
44
45
46
47
48
49
50
51
52
53
54
55
56
57
58
59
from PIL import Image, ImageDraw
import math
import numpy as np

def rotate(p: tuple[int, int], theta: float):
"""
Rotate the point theta degrees
"""
x, y = p
new_x = math.ceil(x * math.cos(theta) - y * math.sin(theta))
new_y = math.ceil(x * math.sin(theta) + y * math.cos(theta))
return (new_x, new_y)

def overlay_grating(img: Image.Image, shade: int, light: int, theta: float = 0.0, color: int = 0):
"""
Overlay a grating where shadow part wide `shade` and bright part wide `light`

However, the size of the grating are the longer part between width and height of the image

Param:
img - Image.open(), witch will be converted to L mode
shade - shadow part width
light - bright part width
theta - controls the angle of the grating
color - grating color

"""
img = img.convert('L')
width, height = img.size
draw = ImageDraw.Draw(img)
def centered(p: tuple[int, int]):
"""
Centered the point
"""
x, y = p
return (x - width // 2, y - height // 2)

def uncentered(p: tuple[int, int]):
"""
Uncentered the point
"""
x, y = p
return (x + width // 2, y + height // 2)

def stretch(p: tuple[int, int]):
"""
Stretch the point to (0~height, 0~height)
"""
x, y = p
if width > height:
return (x, math.ceil(y * width / height))
else:
return (math.ceil(x * height / width), y)

for i in range(0, width, shade + light):
start = uncentered(rotate(stretch(centered((i, 0))), theta))
end = uncentered(rotate(stretch(centered((i, height))), theta))
draw.line((start, end), color, shade)
return img

以线作图

挖坑。

逆字节序

有些图片可能将字节的十六进制形式逆序,例如 PNG 图片的逆序会出现特征:

  • IEND

    49 45 4E 44 AE 42 60 8228 06 24 EA 44 E4 54 94

  • SIG

    89 50 4E 47 0D 0A 1A 0AA0 A1 A0 D0 74 E4 05 98

明显特征:010Editor 会报错

逆序脚本:

1
2
3
4
5
6
infile = 'ZmxhZzQK.png'
outfile = 'out.png'

with open(infile, "rb") as fin:
with open(outfile, "wb") as fout:
fout.write(bytes.fromhex(fin.read().hex()[::-1]))

盲水印

主要是使用了 BlindWaterMark 项目,使用方法:

  • 加盲水印

    1
    python3 bwmforpy3.py encode 原图.png 水印图.png 输出.png
  • 解盲水印

    1
    python3 bwmforpy3.py decode 原图.png 盲水印图.png 输出.png

需要注意的是,盲水印项目要求

1
2
opencv-python==4.2.0.34
matplotlib==2.1.1

特别注意!!!

程序 python2 和 python3 版本的加解密结果会有所不同,主要原因是 python2 和 python3 random 的算法不同,如果要让 python3 兼容 python2 的 random 算法请加 --oldseed 参数。

图片拼接

实现对多张图片的拼接,我们可以使用 montage 软件 (Linux 软件)。

因为 montage 软件可以将图像平铺到可自定义的网格中。

更多关于 montage 软件的使用可以查看:https://imagemagick.org/

montage 软件有以下操作:

  • 将图像平铺到网格中,自动调整大于网格单元大小的图像大小:
1
montage {{image1.png}} {{image2.jpg}} {{imageN.png}} montage.jpg
  • 将图像平铺成网格,从最大的图像自动计算网格单元大小:
1
montage {{image1.png}} {{image2.jpg}} {{imageN.png}} -geometry +0+0 montage.jpg
  • 在平铺之前设置网格单元大小并调整图像大小以适应它:
1
montage {{image1.png}} {{image2.jpg}} {{imageN.png}} -geometry 640x480+0+0 montage.jpg
  • 限制网格中的行数和列数,导致输入图像溢出到多个输出蒙太奇:
1
montage {{image1.png}} {{image2.jpg}} {{imageN.png}} -geometry +0+0 -tile 2x3 montage_%d.jpg
  • 在平铺之前调整图像大小并裁剪图像以完全填充其网格单元:
1
montage {{image1.png}} {{image2.jpg}} {{imageN.png}} -geometry +0+0 -resize 640x480^ -gravity center -crop 640x480+0+0 montage.jpg
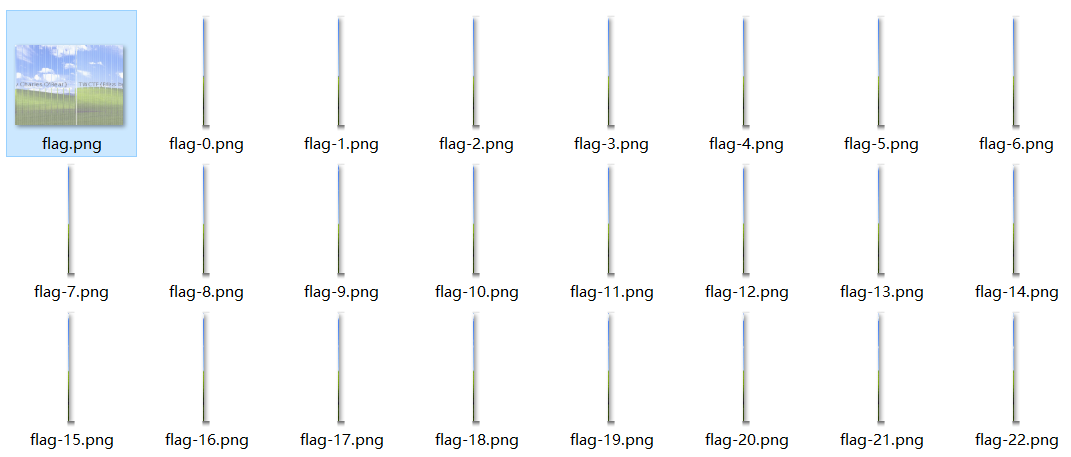
例如我们想要横向拼接 flag-0.pngflag-1.png 等图片,输出文件名为 flag.png,可以使用如下命令:

1
montage flag*.png -tile x1 -geometry +1+0 flag.png 

最终获得间隔 1 个像素,横向拼接的图片:

montage 横向拼接

批量重命名的 Python 脚本:

1
2
3
4
5
6
7
8
import os
import pathlib

path = './images'
path = pathlib.Path(path)
for filename in path.iterdir():
name = filename.name
os.rename(filename, path + name.zfill(8))

使用 Python 脚本拼接图片

1
2
3
4
5
6
7
8
9
10
11
12
13
14
15
16
17
18
19
20
21
22
from PIL import Image

ROW = 25
COL = 25
out_filename = "123.png"

imgs = []
for i in range(ROW * COL):
filename = f'./Red Coast/{i}.png'
imgs.append(Image.open(filename))

SIZE = imgs[0].size
width, height = ROW * SIZE[0], COL * SIZE[1]
new_img = Image.new('RGB', (width, height))
row_offset = 0
for i in range(ROW):
col_offset = 0
for j in range(COL):
new_img.paste(imgs[i * ROW + j], (row_offset, col_offset))
col_offset += SIZE[1]
row_offset += SIZE[0]
new_img.save(out_filename)

横向或纵向拼接

1
2
3
4
5
6
7
8
9
10
11
12
13
14
15
16
17
18
19
20
21
22
23
24
25
26
27
28
29
30
31
32
from PIL import Image
import os

H_MODE = "H_MODE" # 横向拼接
V_MODE = "V_MODE" # 纵向拼接
DIRNAME = ('./img/output/png/') # 图片所在目录
MODE = H_MODE

allimgs = []
dirname, childdir, childfile = next(os.walk(DIRNAME))

# 如果需要排序为(1,2,...,n)
# childfile = sorted(childfile, key = lambda x: int(x[:-3]))

for i in childfile:
filename = dirname + '/' + i
allimgs.append(Image.open(filename))

width0, height0 = allimgs[0].size
if MODE == V_MODE:
width = width0
height = height0 * len(allimgs)
else:
width = width0 * len(allimgs)
height = height0
newimg = Image.new('RGB', (width, height))
for idx, img in enumerate(allimgs):
if MODE == V_MODE:
newimg.paste(img, (0, idx * height0, width0, (idx + 1) * height0))
else:
newimg.paste(img, (idx * width0, 0, (idx + 1) * width0, height0))
newimg

拼图

拼图问题我们可以使用 gaps,一个基于遗传算法的拼图求解器,具有块大小自动检测功能 (最好使用 Linux 安装)。Gaps Github 主页

gaps 参数如下

选项 描述
--image 拼图路径
--size 拼图大小 (以像素为单位)
--generations 遗传算法的代数
--population 遗传算法中的人数
--verbose 在每一代之后显示最佳解决方案
--save 将拼图结果另存为图像

同时可以使用 gaps --help 获取更多帮助。

如果没有明确提供 --size 参数,gaps 会自动检测块的大小。

并且最好需要对小图块的长和宽分别进行尝试。(一般来说会使用最小值)

往往有时单次拼图得到的结果并不够好,可以进行多次拼图。

自动化隐写探测

隐写工具 zsteg 可以检测 PNG 和 BMP 图片里的隐写数据,在 Linux 里可以直接安装使用。zsteg Github 主页

目前,zsteg 支持检测:

  • LSB steganography in PNG & BMP
  • zlib-compressed data
  • OpenStego
  • Camouflage 1.2.1
  • LSB with The Eratosthenes set

使用方法:

1
zsteg 可疑图片.png

如果想要查看更详细的信息:

1
zsteg -a 可疑图片.png

更多用法请使用 zsteg -h 或者查看 Github 主页。

BMP 取证

负高度

BMP 图片的高度可以是负的,这将使得 lines[] 数组翻转(或者说原始图片翻转)。

保留字节拼图

在 BMP 头中存在四个保留字节,可能会被用于保存坐标,提取方式类似

1
2
bfReserved1 = int.from_bytes(imgdata[0x06:0x08], 'little')
bfReserved2 = int.from_bytes(imgdata[0x08:0x0a], 'little')

拼图后一定要记得把图片顺序先理一遍哦。

pad_bytes

BMP 图片会把数据分成一行一行的,在文件格式中以 lines[] 数组保存,当图片的数据宽度小于每一行所分配的数据,那么会填充 pad_bytes 来保证数据格式读取的完整性。

那么我们可以在 BMP 图片的 lines 数组中隐写数据。

要计算 pad_bytes,需要从头中获取 sizesize 需要减去头的大小,然后计算 pad_size = size / height - width * 3 即是 pad_bytes 数据。

JPG 取证

简述

以下的各种图片取证形式仅限于 JPG 图片格式。

jphs

一款 jpg 隐写软件,目前 Github 仓库已关闭 push,建议直接使用 jphs for windows 软件,可以在 http://io.acad.athabascau.ca/~grizzlie/Comp607/programs.htm 中获取。

据说在国内常常使用。

点击 open jpeg 打开图片后,可选 pass phrase 添加密码,然后点击 hide 或者 seek 即可进行隐写和数据提取。

outguess

outguess 是一款开源的隐写软件,支持对 jpeg 的数据隐写。

可以在 Github 主页中获取软件,也可以在 Linux 中使用包管理软件进行安装。

sudo apt install outguess

outguess 保留基于频率计数的统计信息,故一般的统计测试没有办法检测出通过该软件隐写的数据,故其隐写的隐蔽性极高。

加密:

1
outguess -k password -d hidden.txt in.jpg out.jpg

解密:

1
outguess -k password -r out.jpg hidden.txt

thumbnail

thumbnail 是 exif 信息的一部分,是 JPG 图片用作显示的略缩图,但在现在的系统中往往不被使用。

PNG 取证

简述

以下的各种图片取证形式仅限于 PNG 图片格式。

图片 IHDR CRC32 错误

一般情况下这是因为宽度或者高度被篡改的缘故,可以使用以下代码对图片的宽度或者长度进行爆破:

1
2
3
4
5
6
7
8
9
10
11
12
13
14
15
16
17
18
19
20
21
22
23
24
25
26
27
28
29
30
31
32
33
34
35
36
37
38
39
40
41
42
43
44
45
46
47
48
49
50
51
52
53
54
55
56
57
58
59
60
61
62
63
64
65
66
67
68
69
70
71
72
73
74
75
76
77
78
79
80
81
82
83
84
85
86
87
88
89
90
91
92
93
94
95
96
97
98
99
100
101
102
103
104
105
106
107
108
109
110
111
112
113
114
115
116
117
118
119
120
121
122
import binascii
import struct

def get_ihdr(filename: str):
"""
Return IHDR content and its CRC32 value

Param:
filename - filename needed to parse

Return:
(ihdr, crc)
"""
with open(filename, 'rb') as f:
head = f.read(33)
ihdr, crc = struct.unpack_from('>17sI', head, 12)
return ihdr, crc

def fix_ihdr_to_file(filename: str, outfilename: str, ihdr: bytes):
"""
Save the new IHDR content to new file

Param:
filename - old PNG file
outfilename - new PNG file
ihdr - IHDR content bytes
"""
with open(filename, 'rb') as f:
data = f.read()
new_data = data[:12] + ihdr + data[29:]
with open(outfilename, 'wb') as f:
f.write(new_data)

def generate_ihdr(old_ihdr: bytes, new_width: int, new_height: int):
"""
Old IHDR turn to new IHDR with new width and height

Param:
old_ihdr - IHDR content bytes
new_width - new width
new_height - new height

Return:
new IHDR content
"""
return struct.pack('>4sII5s', old_ihdr[:4], new_width, new_height, old_ihdr[-5:])

def fix_ihdr_width(filename: str, max_width: int = 0xFFFF, *, out: bool = True):
"""
Fix the width in IHDR content by calculating CRC32

Param:
filename - PNG filename
max_width - max width to crack
out - whether output the correct IHDR file

Return:
fixed width and fixed height
"""
ihdr, crc = get_ihdr(filename)
width, height = struct.unpack_from('>II', ihdr, 4)

for fixed_width in range(1, max_width):
new_ihdr = generate_ihdr(ihdr, fixed_width, height)
if binascii.crc32(new_ihdr) == crc:
print(f'fixed width: {fixed_width}')
print(f'fixed height: {height}')
if out:
fix_ihdr_to_file(filename, f'{fixed_width}x{height}{filename}', new_ihdr)
return fixed_width, height

def fix_ihdr_height(filename: str, max_height: int = 0xFFFF, *, out: bool = True):
"""
Fix the width in IHDR content by calculating CRC32

Param:
filename - PNG filename
max_height - max height to crack
out - whether output the correct IHDR file

Return:
fixed width and fixed height
"""
ihdr, crc = get_ihdr(filename)
width, height = struct.unpack_from('>II', ihdr, 4)

for fixed_height in range(1, max_height):
new_ihdr = generate_ihdr(ihdr, width, fixed_height)
if binascii.crc32(new_ihdr) == crc:
print(f'fixed width: {width}')
print(f'fixed height: {fixed_height}')
if out:
fix_ihdr_to_file(filename, f'{width}x{fixed_height}{filename}', new_ihdr)
return width, fixed_height

def fix_ihdr_wh(filename: str, max_width: int = 0xFF, max_height: int = 0xFF, *, out: bool = True):
"""
Fix the width in IHDR content by calculating CRC32

Param:
filename - PNG filename
max_width - max width to crack
max_height - max height to crack
out - whether output the correct IHDR file

Return:
fixed width and fixed height
"""
ihdr, crc = get_ihdr(filename)

for fixed_width in range(1, max_width):
for fixed_height in range(1, max_height):
new_ihdr = generate_ihdr(ihdr, fixed_width, fixed_height)
if binascii.crc32(new_ihdr) == crc:
print(f'fixed width: {fixed_width}')
print(f'fixed height: {fixed_height}')
if out:
fix_ihdr_to_file(filename, f'{fixed_width}x{fixed_height}{filename}', new_ihdr)
return fixed_width, fixed_height

filename = 'incorrect_ihdr.png'
fix_ihdr_wh(filename)

复制粘贴代码,使用 fix_ihdr_width(filename) 函数爆破图片宽度;使用 fix_ihdr_height(filename) 函数爆破图片高度;使用 fix_ihdr_wh(filename) 同时爆破宽高。

Acropalypse

依赖于漏洞 CVE-2023-28303 和 CVE-2023-21036,针对 Windows Snipping Tool 和 Google Pixel 截图工具,两者在对截图裁剪时会泄露裁剪外的信息,特点是在图片数据中会有两个 IEND 块。

使用工具 https://github.com/frankthetank-music/Acropalypse-Multi-Tool 即可还原泄露的信息。

IDAT 块

苹果提出的 PNG 标准块,用于加速 PNG 的解压(渲染),可以使用在线网站ICC+ 功能导出 IDOT 块隐藏的内容。

ImageMagic

CVE-2022-44268,任意文件读取。

使用 ImageMagic 的 convert 功能转换成 PNG 图片时,会携带部分信息。

POC:https://github.com/Sybil-Scan/imagemagick-lfi-poc

使用方法:

1
python3 generate.py -f "/etc/passwd" -o exploit.png

利用方式:

1
convert exploit.png result.png

获取到结果图片后,输入命令读取 PNG 携带的内容:

1
identify -verbose result.png

GIF 取证

简述

以下的各种图片取证形式仅限于 GIF 图片格式。

GIF 分离

如果需要对每一帧图片进行详细操作的话,最好使用 photoshop 打开 GIF 图片,PS 会自动将 GIF 图片的每一帧转换为图层。

如果只是想要查看每一帧的话,可以使用 Kinovea 或者 Stegsolve 来查看。

也可以使用在线网站获取每一帧:https://tu.sioe.cn/gj/fenjie/

但是最简单的获取 GIF 每一帧图片的方式,可以通过使用 convert 软件 (Linux 软件)。

有关 convert 软件更多详情可以查看 https://imagemagick.org/

以下只介绍 convert 分离 GIF 每一帧的用法:
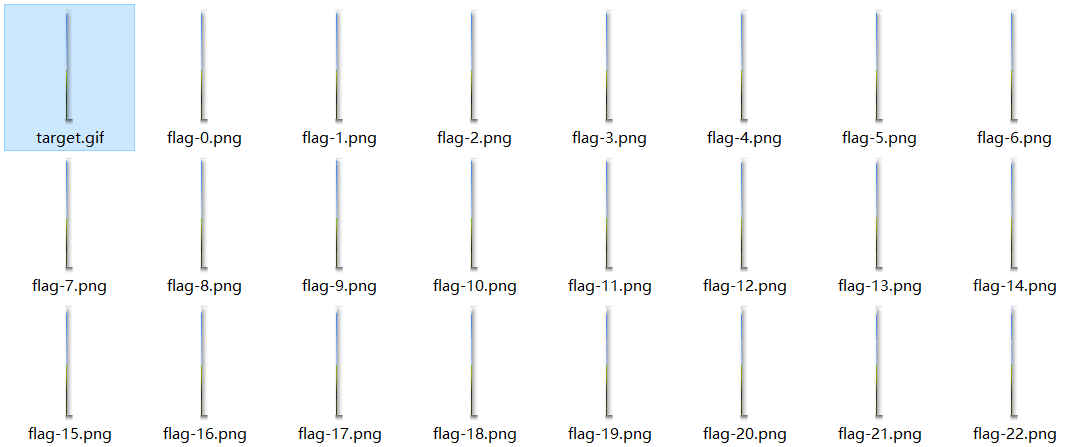
1
convert target.gif 输出名.png

例如输入参数为 convert target.gif flag.png,那么软件将会把 target.gif 的每一帧转换为 flag-0.pngflag-1.png 等等,如图所示:

convert 处理后

GIF 帧时间

convert 软件并不会将帧时间导出,此时需要手动将帧时间导出

1
identify -format "%T " flag.gif